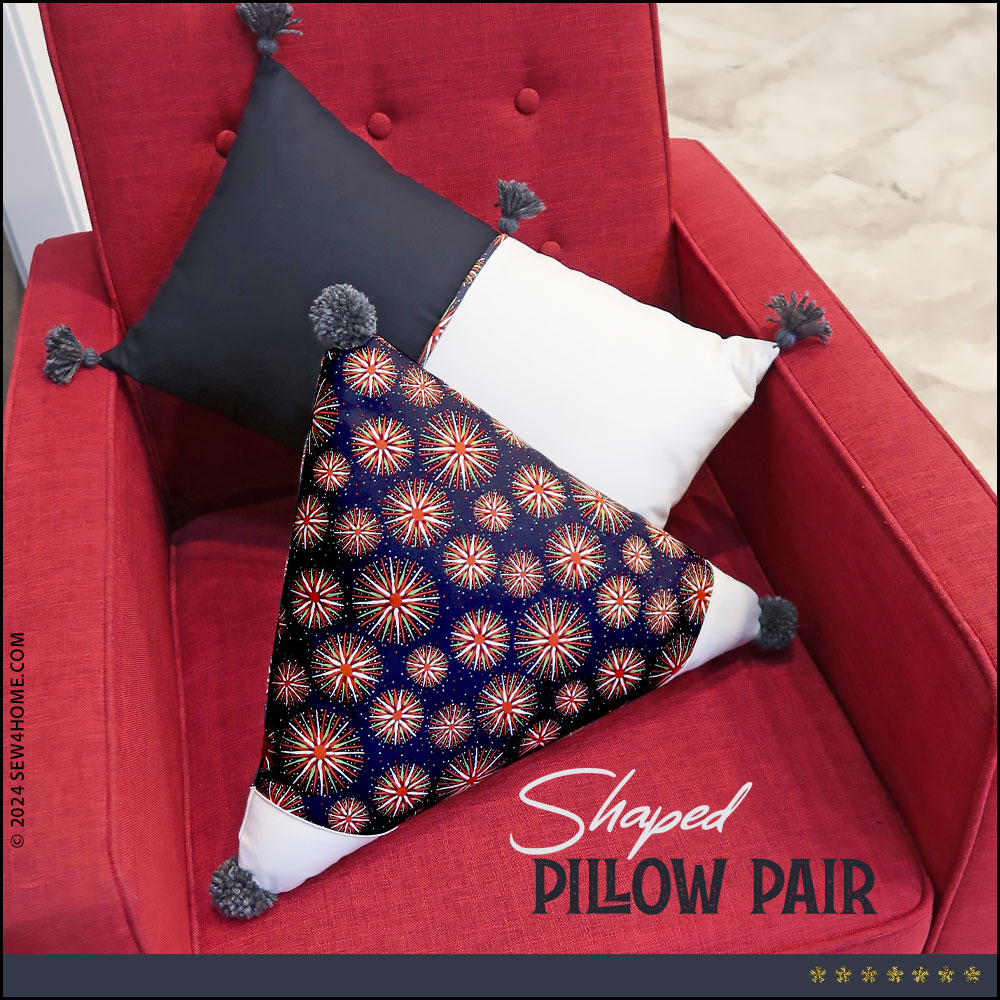
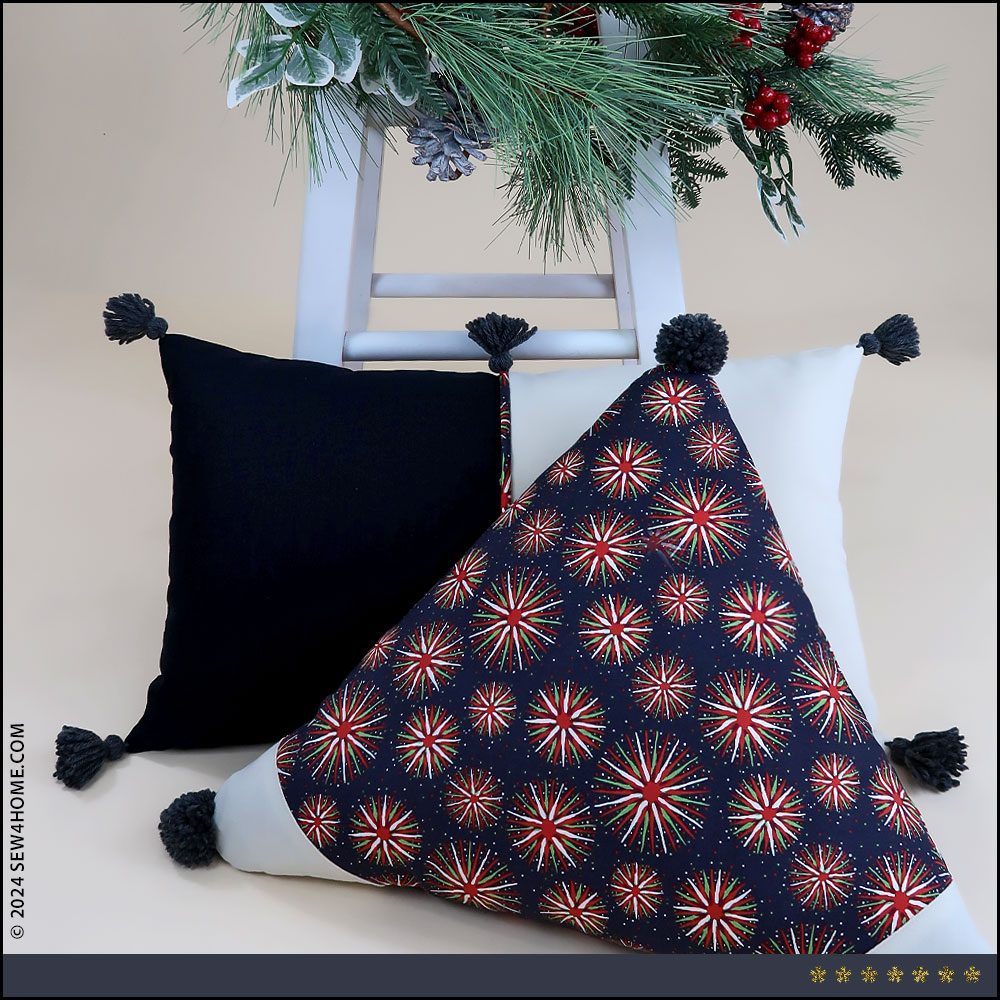
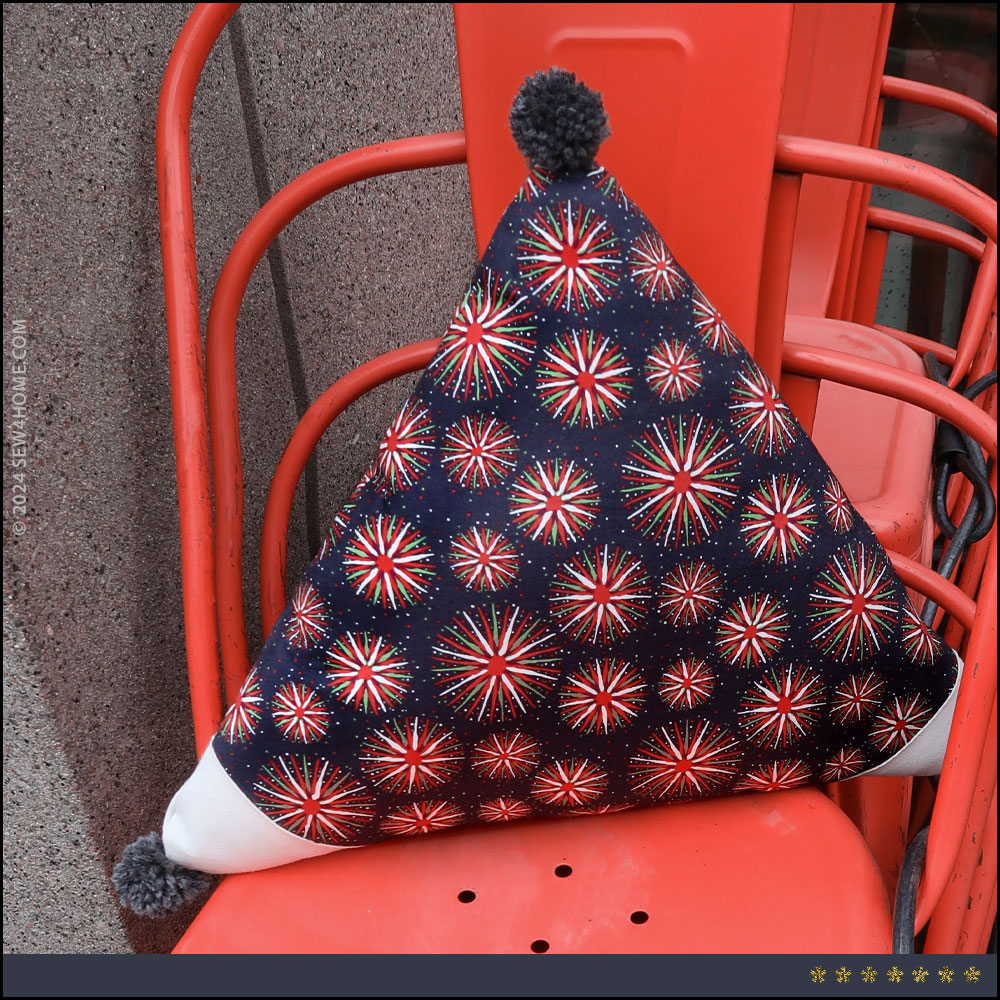
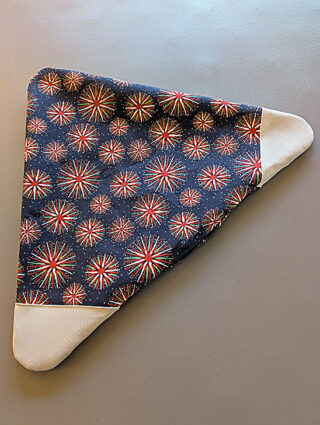
With all that going for it, who could resist a new pillow project? Certainly not S4H, and certainly not without an interesting angle… literally. Add something different to your standard square pillow pile with a triangle and rectangle (also known as a lumbar). Now that you’re expanding into new shapes and sizes, make them extra unique with custom poms and tassels.
Our thanks to Janome America for sponsoring this project and, as always, giving us the opportunity to do our sewing on a wide range of Janome models. For a simpler project like this, you might assume any machine will do. But we’d like to poke a major hole in that assumption.
If you are brand new to sewing, a quality machine can make all difference both in your samples and your sanity! We’ve run into so many folks who are convinced they are “bad at sewing,” but when we dig just below that frustrated surface, more often than not we find it’s a machine behind their problems. If you’re using a cheaply constructed machine you dug out of your grandmother’s closet or snapped up at a rummage sale, chances are it will not be the right companion on your sewing journey. You need a machine that is smartly designed, precise, powerful, and reliable. For us, this has always meant a Janome – from their entry level work horses to their top-of-the-line sewing and embroidery marvels. The better your tools, the more creative you become!
Flip the switch on your well-designed, properly maintained machine, and – yes – this is an easy pillow pair. We detail all the stitch selections used, some extra tips for more efficient cutting, and any specialty presser feet we pulled out to make the job faster. You’ll also want to make sure you press-as-you-go for the smoothest finish, and do consider spending a few extra dollars to get a quality pillow insert and non-clumping polyester filler. Quality supplies = professional results.
We used a quilting cotton for the main panels of the triangle pillow and the accent piping on the lumbar. The solid fabric, in two colors to coordinate with the main print, is a lighter weight linen with a textured weave that is a perfect juxtaposition to the smooth cotton.
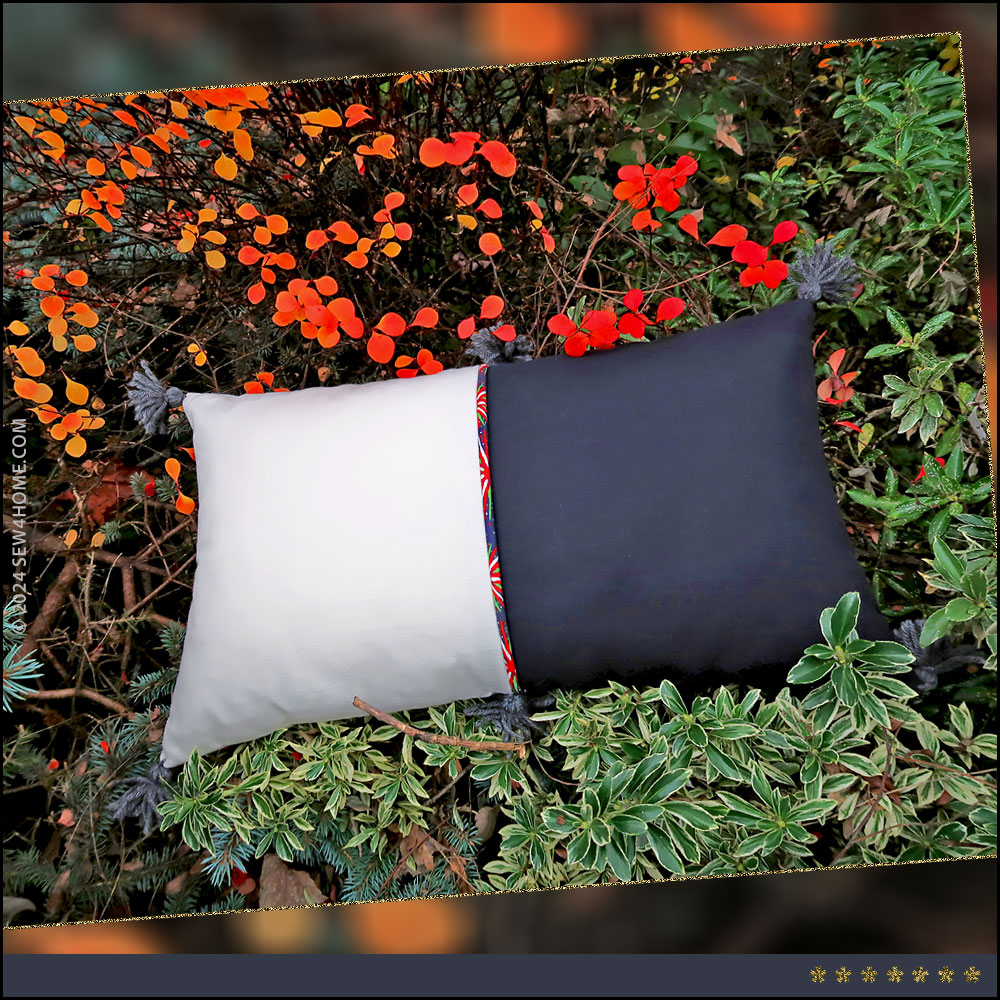
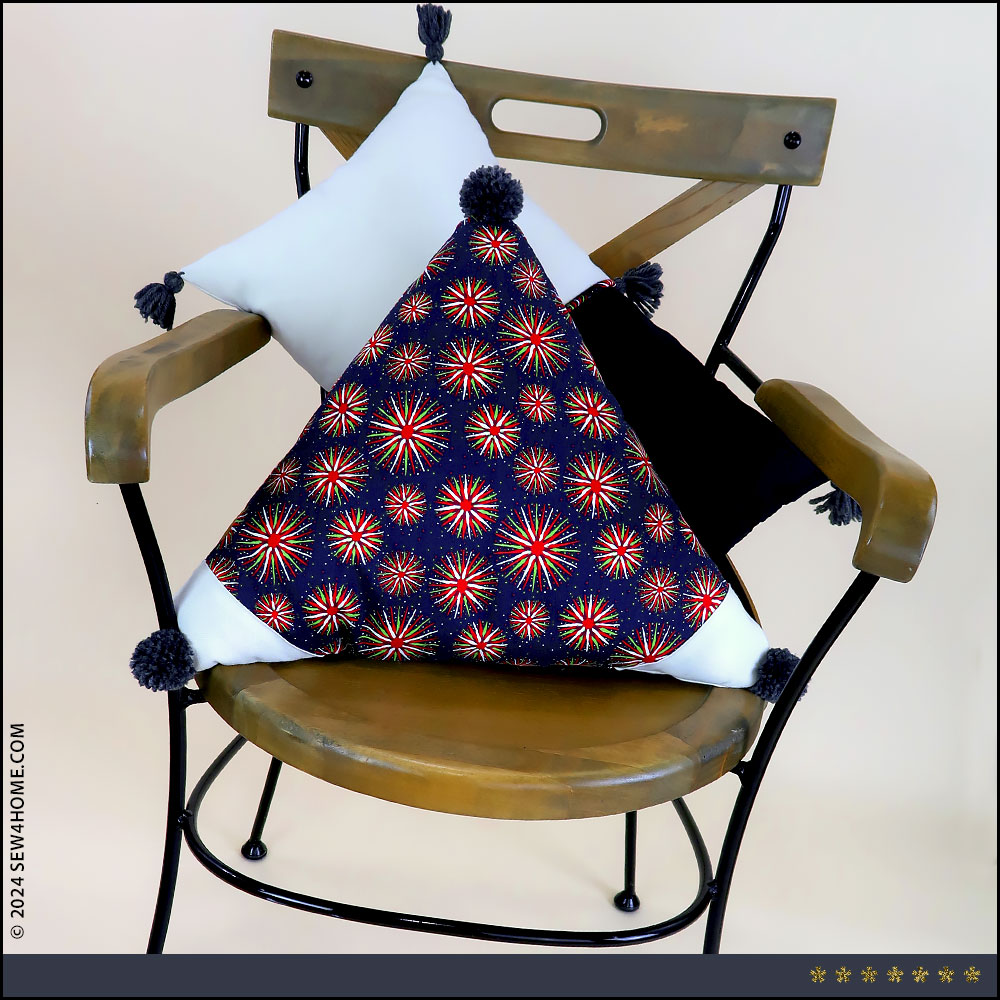
The finishing touch on both pillows are the custom yarn pom poms and tassels. We used a pom maker for the three corners of the triangle. Poms are fun and easy to create… you might just find that after making just one of these bouncy balls, all kinds of items need them! The lumbar pillow features petite tassels at each corner as well as at the top and bottom of of the center piping accent. These cuties are a blend of a standard tassel and what we call a Yarn Chubby. The steps for construction and attachment are summarized below, but we also have full tutorials on Creating Pom Poms with a Pom Maker, Broomstick Tassels + Yarn Chubbies, and standard Floss Tassels.
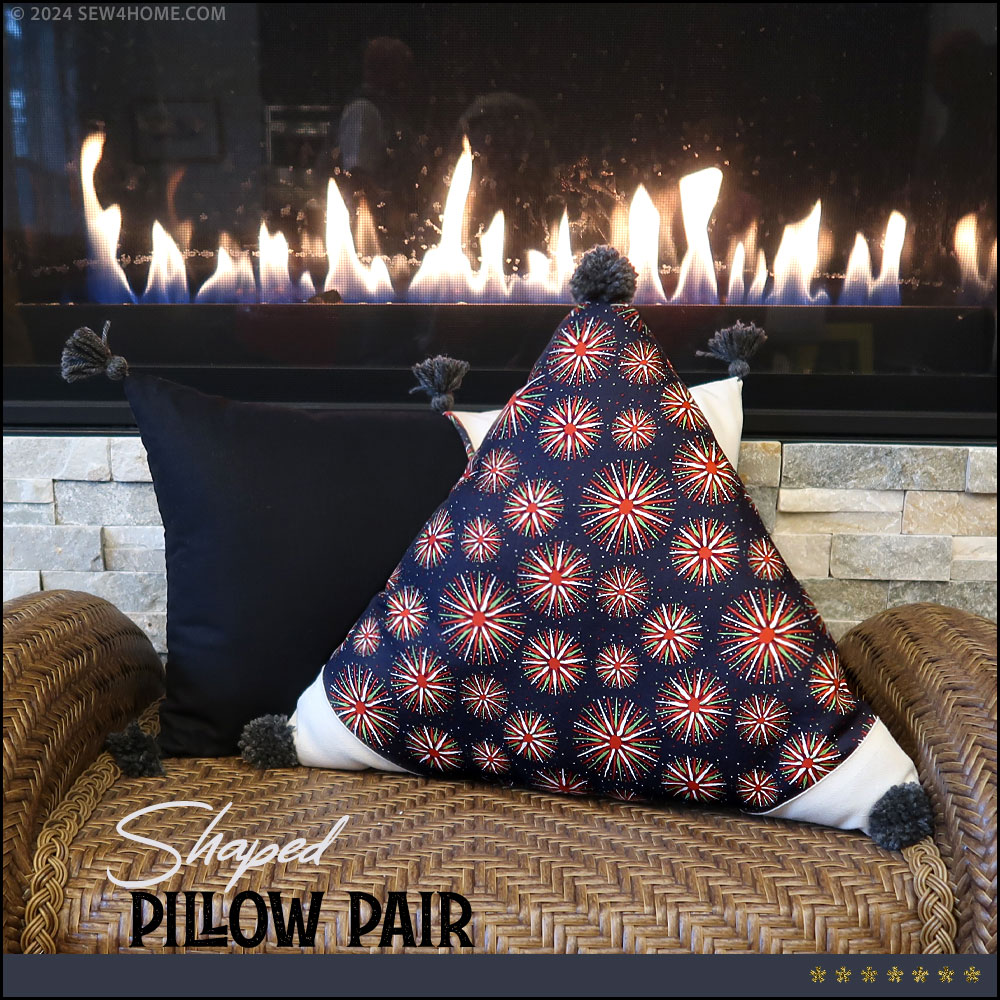
One or both of these pillows is perfect as an “instant update” for your holiday decorating or just as a fun, year ‘round way to add new shapes and styles into the mix.
Our thanks again to Janome America for their support of this project and many of our other most popular projects. If you’re ready for frustration-free sewing and want to find out more about the amazing Janome machines, visit their website, follow them on social media, and – best of all – visit a local dealer for an in-person test stitch.
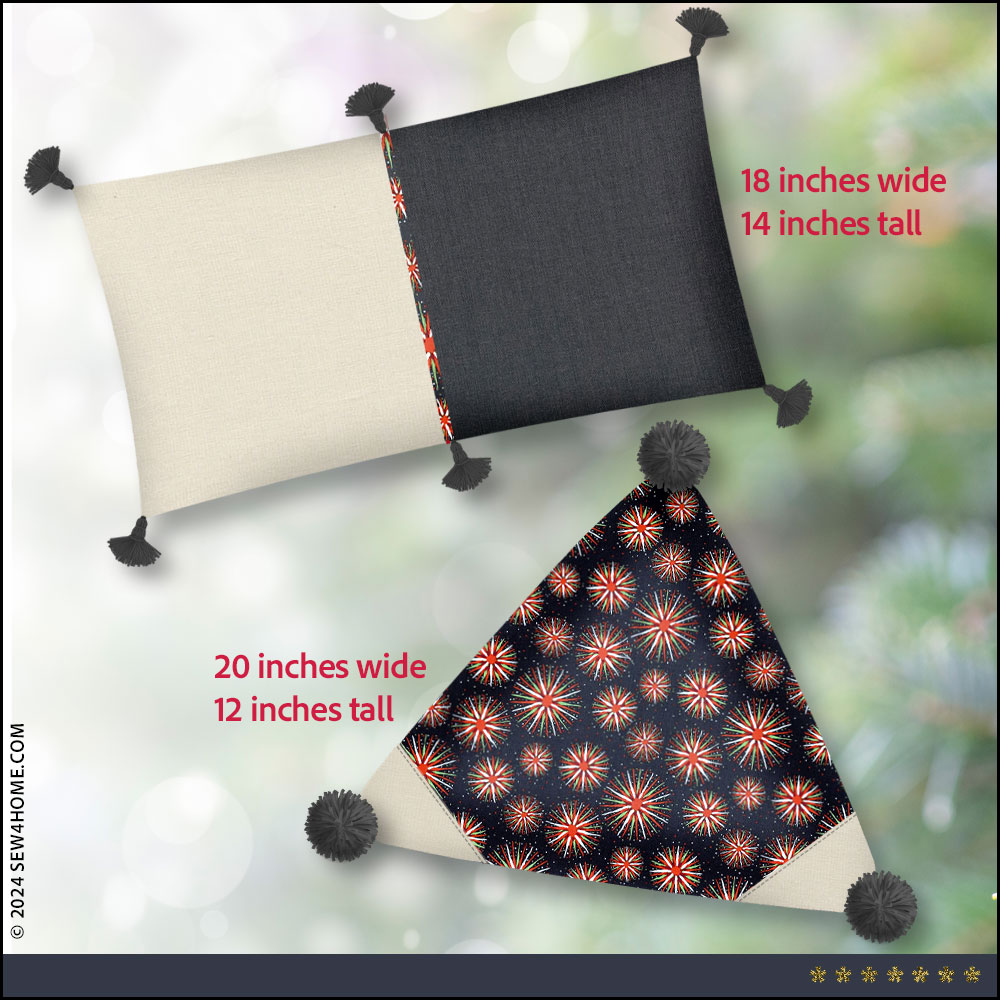
Our Triangle Pillow finishes at approximately 18” wide at the base x 14” high at the top corner. The Rectangle Pillow finishes at approximately 20” wide x 12” high. Both of these measurements exclude the poms/tassels. The front and back of each pillow are identical and both shapes are sewn closed, in other words, the covers are not designed to be removed without ripping out a seam.
Sewing Tools You Need

- Sewing Machine and standard presser foot
- Wide Groove Beading foot; optional for the lumbar pillow’s piping application; you could also use a standard Zipper foot or Adjustable Zipper foot
Fabric and Other Supplies
NOTE: Yardage and supplies are shown for creating a pair of pillows. All cuts are detailed in the Getting Started section, so you can certainly refer to those as your guide should you wish to reduce the supplies shown in order to create just one of the pillows.
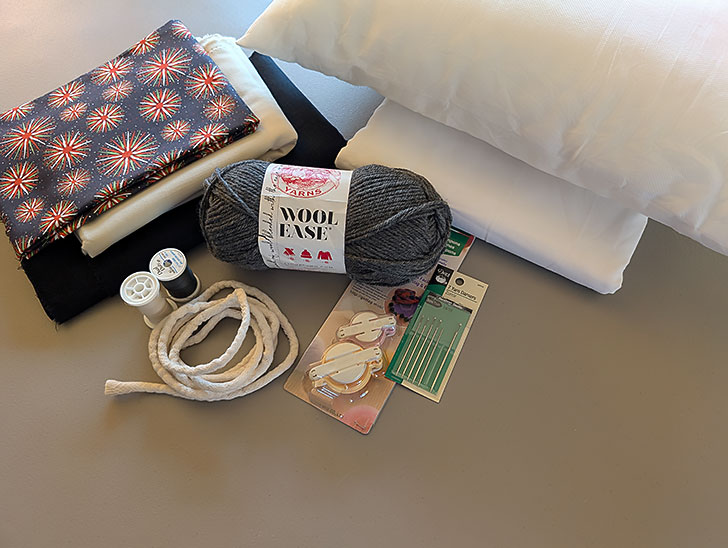
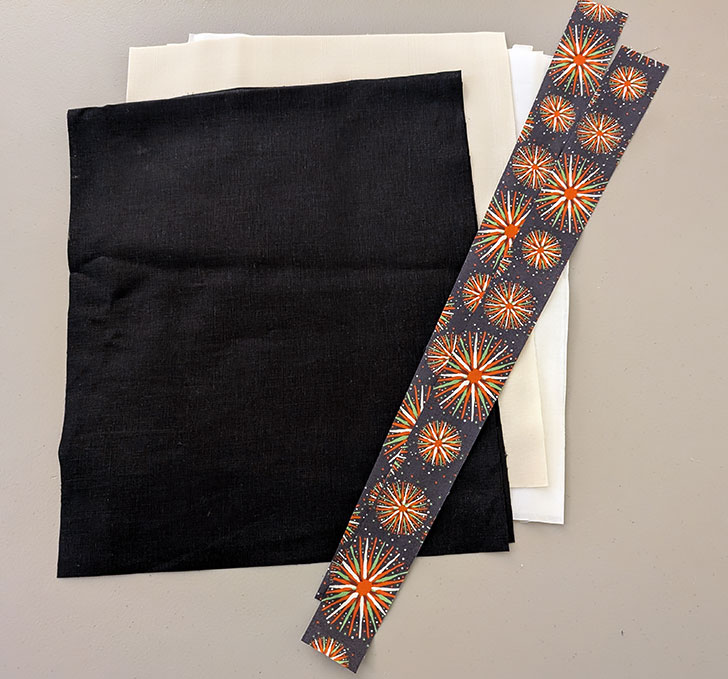
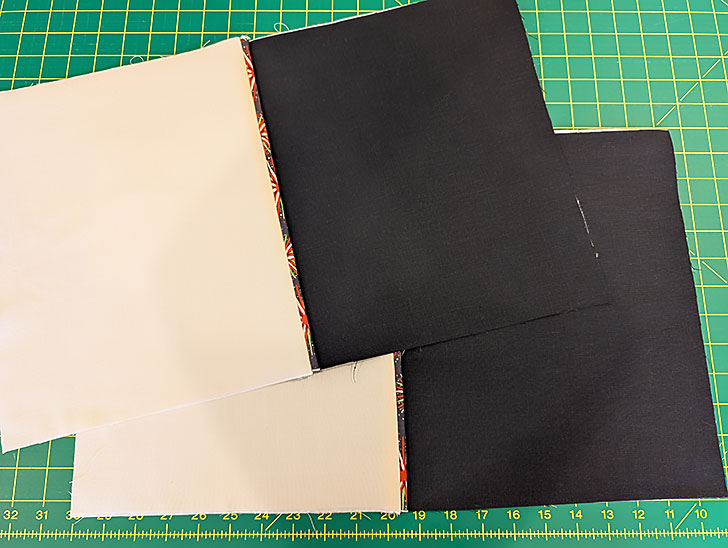
- 1 yard of 44″+ wide quilting weight cotton for the main panels of the triangle pillow and the bias cut piping strips of the lumbar pillow; we originally used Retro Ho Ho by Andover Fabrics
- ½ yard of 44″+ wide linen, linen blend or similar for the triangle pillow’s corner highlights and one half of the lumbar pillow; we originally used Brussels Washer Rayon/Linen blend by Robert Kaufman in Ivory
- ½ yard of 44″+ wide linen, linen blend or similar for the other half of the lumbar pillow; we originally used Brussels Washer Rayon/Linen blend by Robert Kaufman in Black
- 2½ yards of 20”+ wide lightweight fusible interfacing for both pillows; we used woven Pellon Shape-Flex
- 1 yard of ¼” piping cord
- ONE 20” x 12” pillow form for the lumbar pillow; we suggest a down or down alternative for a softer/flatter finish
- ONE 13oz+ bag of polyester fiber fill for the triangle pillow; look for a non-clumping filler – often these are displayed as a premium option for doll and stuffed animal making
- ONE skein of thinner yarn for the poms/tassels on both pillows – should coordinate with the darker of your two solid colors; we originally used Lion Brand Wool Ease Worsted Yarn in Oxford Gray
- Clover Pom Maker in Small Size Set (1⅜” + 1⅝”); we used 1⅝”
- All-purpose thread to match fabric
- See-through ruler
- Fabric pen or pencil
- Iron and ironing board
- Scissors and/or rotary cutter and mat
- Seam gauge
- Seam ripper
- Straight pins
- Small piece of cardboard or similar to help create the petite tassels; ours was 2” x 4½”
- Standard hand sewing needle
- Yarn darner or similar needle for attaching poms/tassels
Getting Started and Pattern Download
Triangle Pillow
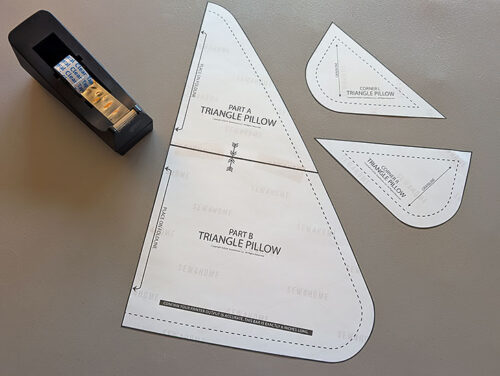
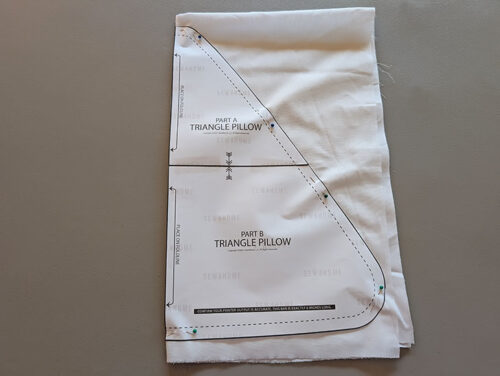
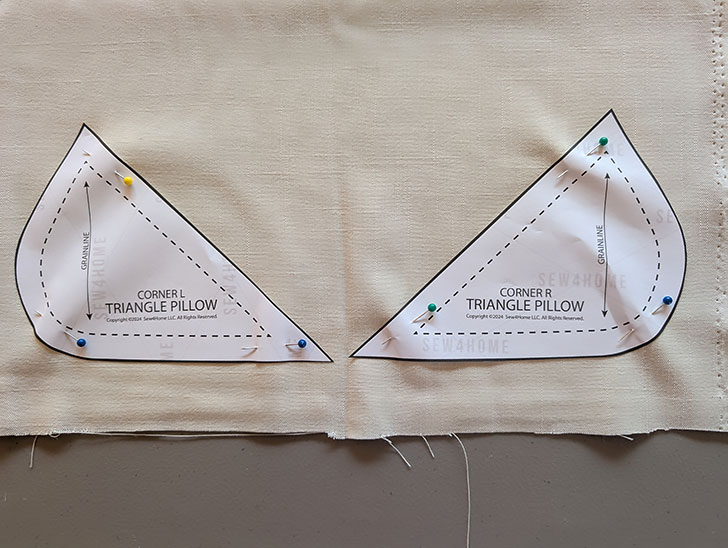
- Download and print the pattern pieces for this project: TRIANGLE PILLOW PART A, TRIANGLE PILLOW PART B, AND TRIANGLE PILLOW LEFT AND RIGHT CORNERS

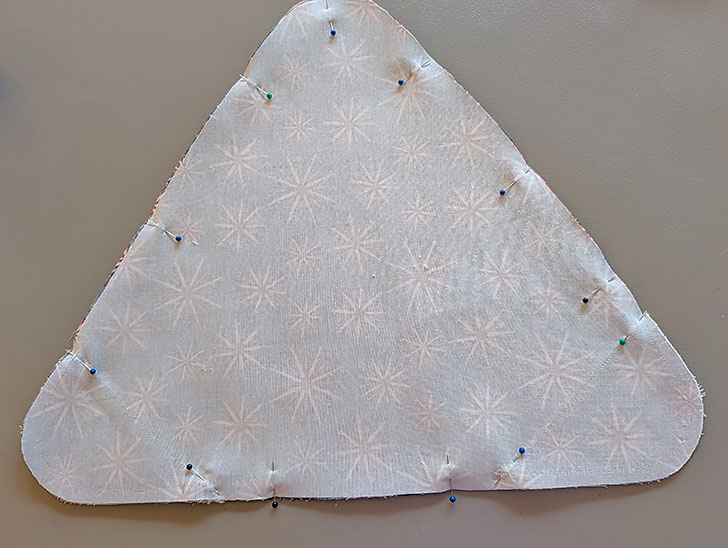
NOTE: This download consists of THREE 8½” x 11″sheets containing pieces for all the patterns. You must print the PDF file at 100%. DO NOT SCALE OR SHRINK to fit the page. There is a guide rule on each sheet to confirm your printout is correct. Print horizontally (landscape). - Cut out each pattern piece along its solid outer line.
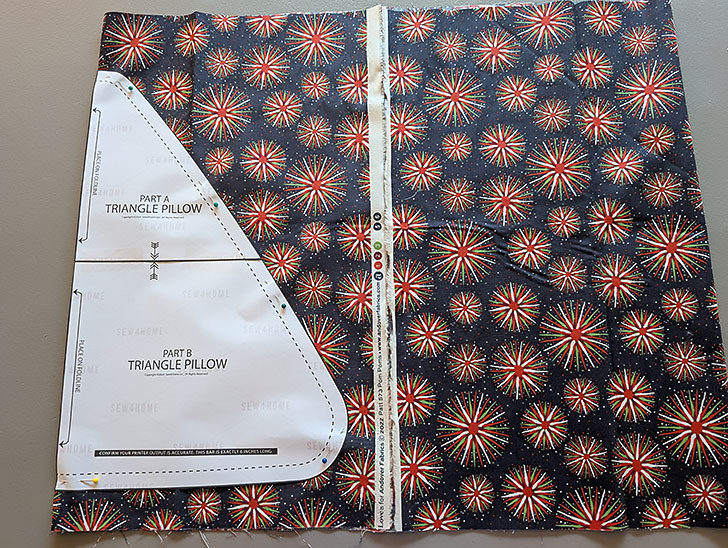
- For the Triangle Pillow pattern, aligning the printed arrows, butt together and tape (do not overlap) Top A and Bottom B to form the complete Triangle pattern. This pattern is designed to be cut on-the-fold. The corners are two separate pieces.
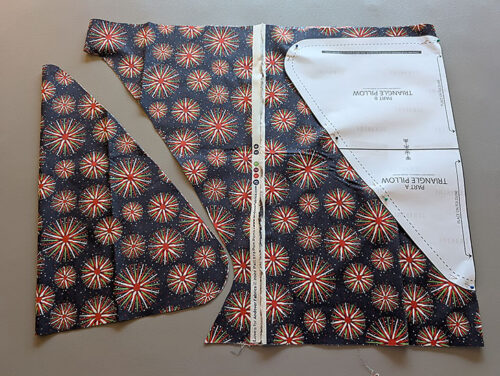
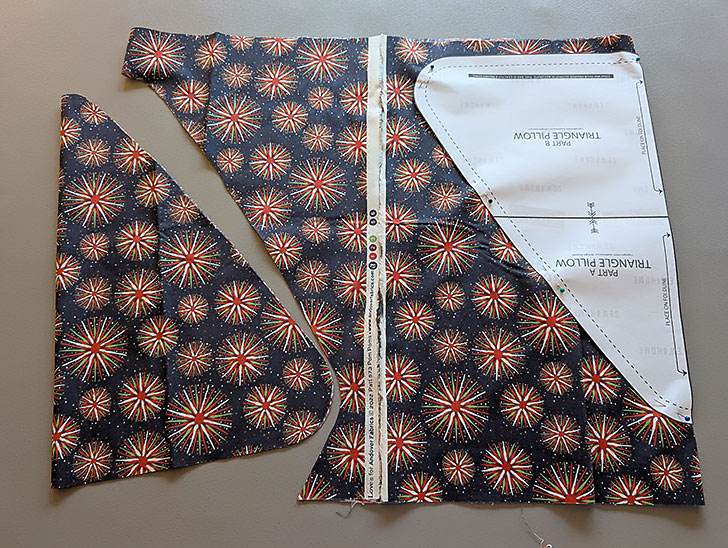
- From the main print fabric, first cut a rectangle WOF (width of fabric) x ½ yard (18”). Refold this strip, bringing either end into the center so the selvedge edges are centered. You now have two folded edges. Position the triangle pattern along each fold to cut.
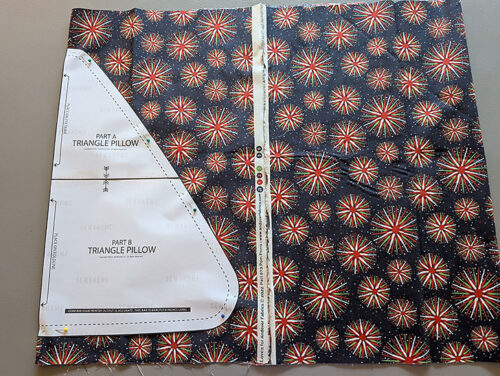
- This efficient cutting plan yields two triangle panels: one front and one back.
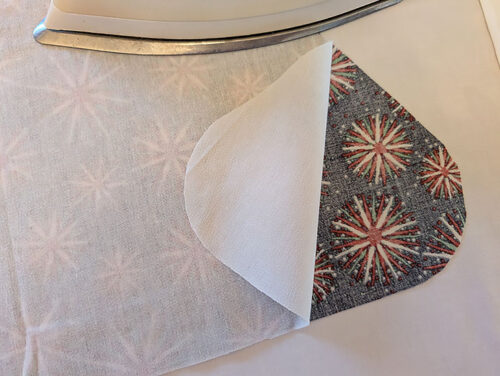
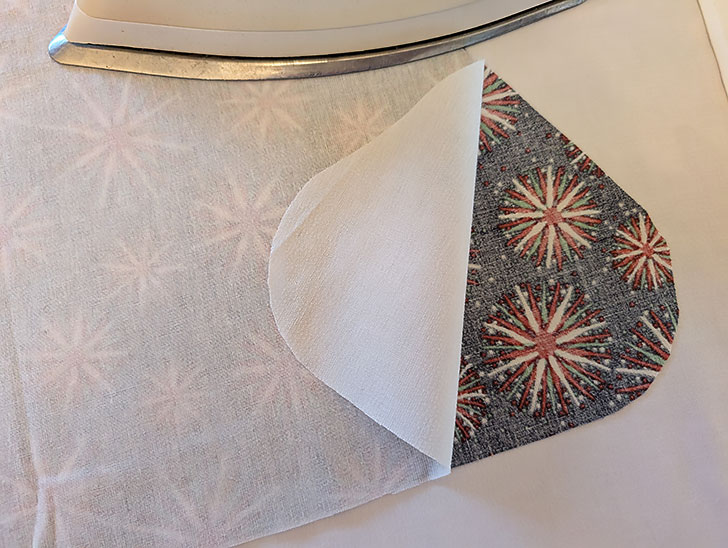
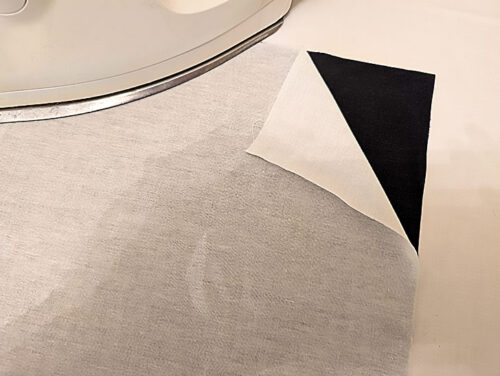
- From the lightweight interfacing, cut a 1 yard length. Cut TWO triangles using the pattern. As shown in the photo below, you can streamline the cutting process by folding the interfacing into quarters, and pinning the pattern along the fold.
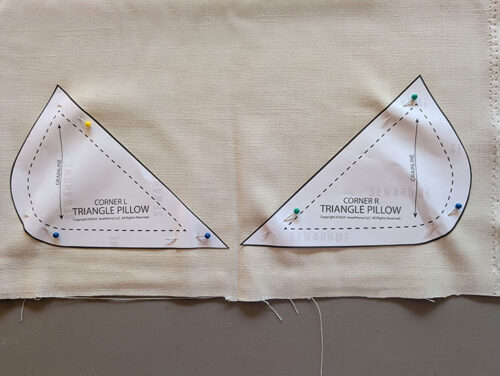
- From the lighter color linen (the ivory in our sample), cut TWO pairs of corners – in other words, two right corners and two left corners. Pay attention to the grain line on the pattern pieces. The remaining fabric will be used for one half of the lumbar pillow.


Lumbar Pillow
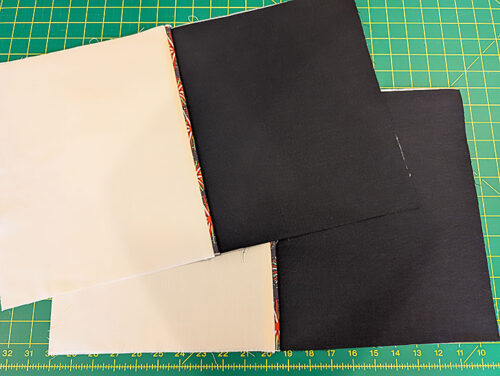
- From the darker color linen (the black in our sample), cut TWO 11” wide x 13” high rectangles.
- From the lighter color linen (the remaining ivory in our sample), cut TWO 11” wide x 13” high rectangles.
- From the remaining lightweight interfacing, cut FOUR 11” x 13” rectangles.
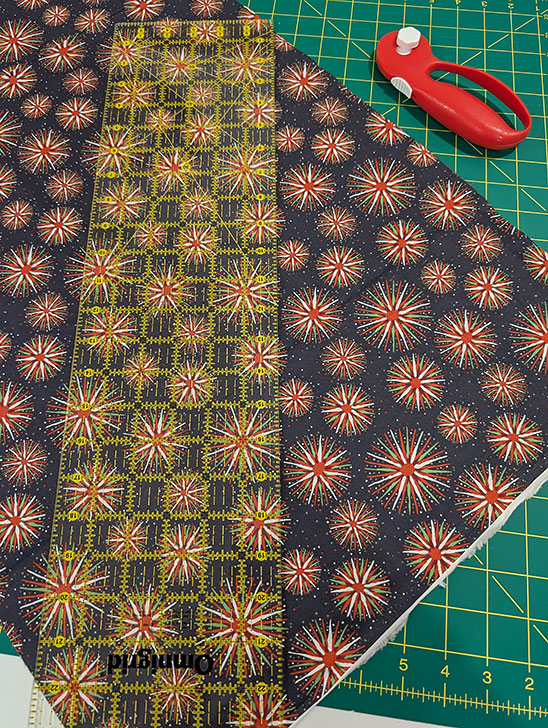
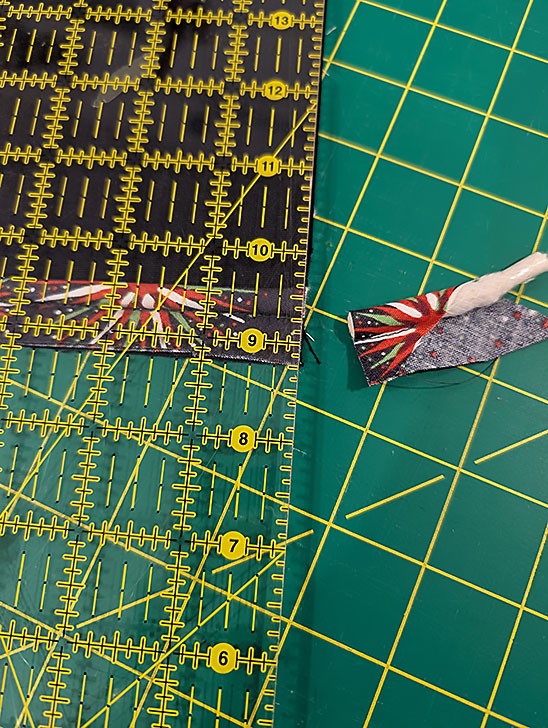
- From the remaining main print fabric, cut TWO 2” x 18” strips on the bias for the piping.
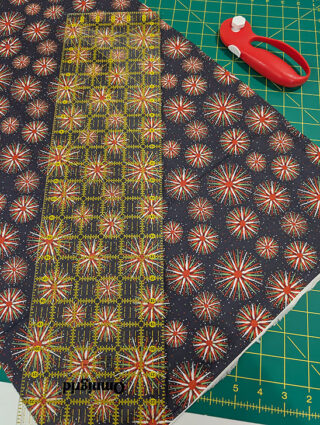
NOTE: We took the time to fussy cut our bias strips to center our fabric’s starburst motif. Although the piping is essentially a straight line on the front and back of the pillow, we still recommend cutting these strips on the bias. This allows the fabric to more smoothly wrap around the piping cord and maintain that smoothness across the slight curve the pillow. The slight wider-than-necessary width accommodates the fussy cut, and it will be trimmed after wrapping the cord.
At Your Sewing Machine & Ironing Board
Triangle pillow
Interface and place the corners
- Find the two main triangle panels and the two matching panels of interfacing.
- Place an interfacing panel on the wrong side of each main panel. The edges should be flush all around. Following manufacturer’s instructions, fuse the interfacing in place.
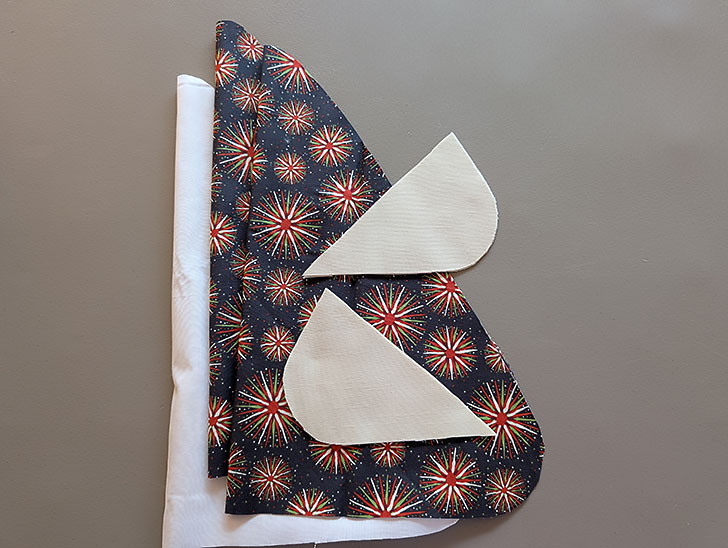
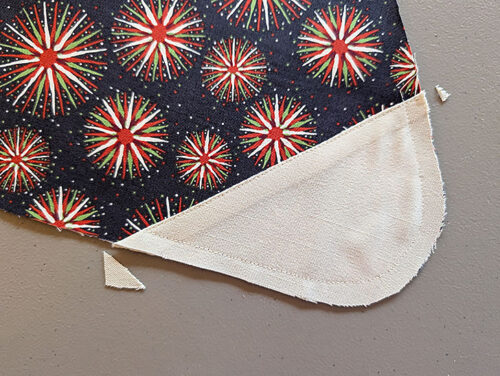
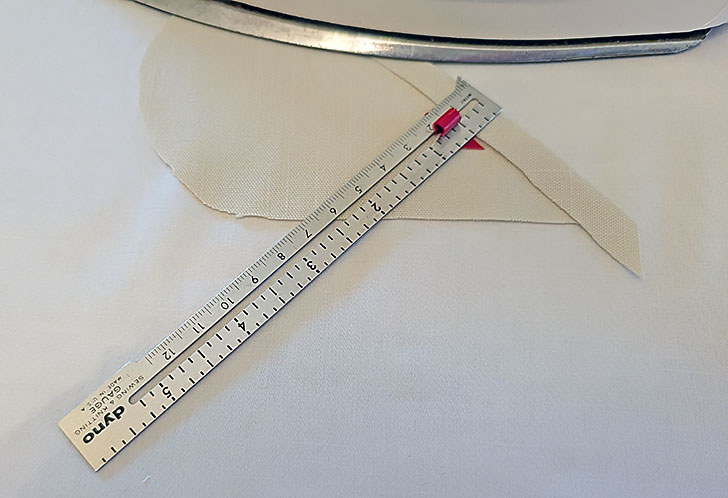
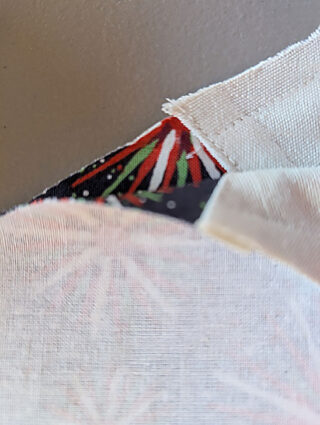
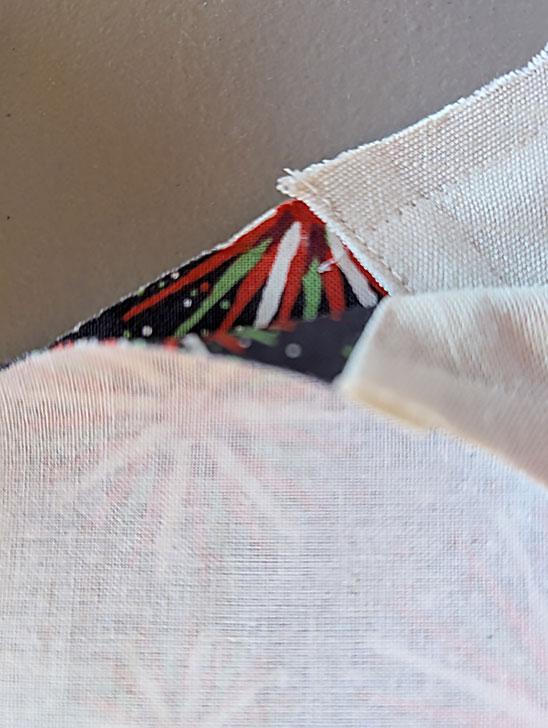
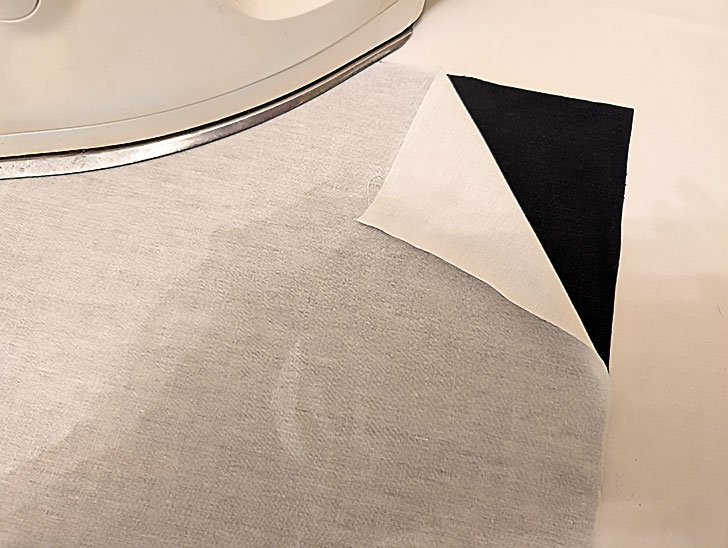
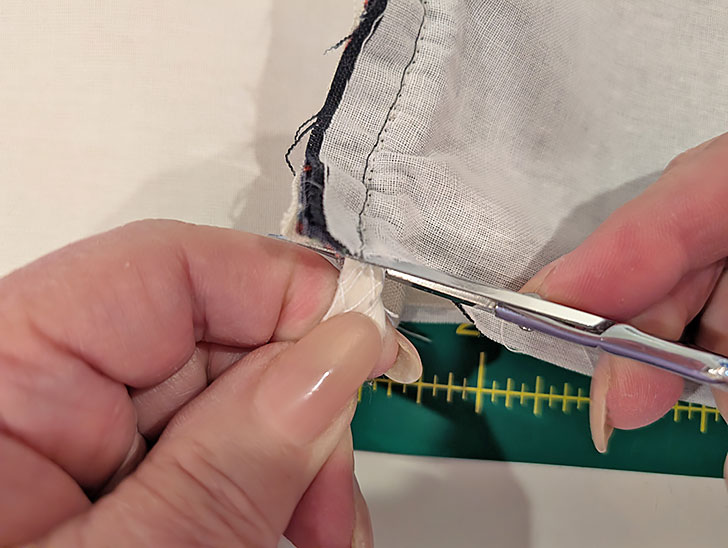
- Find the four corner pieces. Make sure you have two pairs: two pieces facing left and two pieces facing right. Along the straight edge of each piece, fold back ½” and press well.

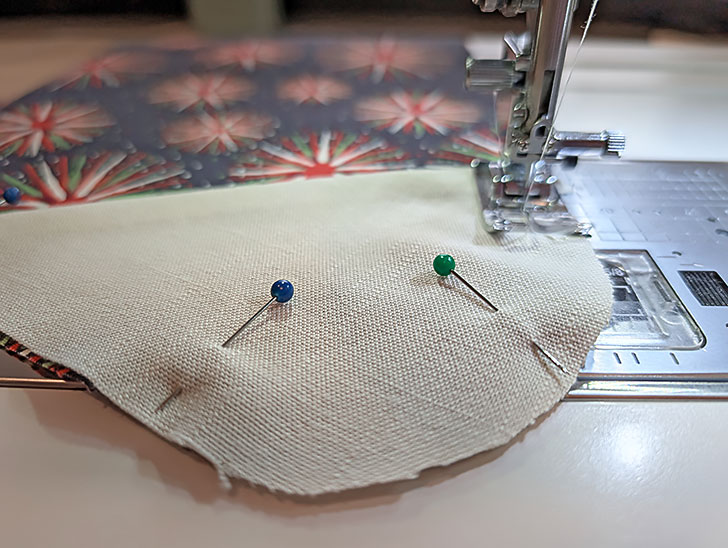
- Position two of the corners on each interfaced triangle. The outer edges of the corner pieces should be flush with the outer edges of the main triangle. Pin in place.

- Thread the machine with thread to best match the corner fabric in the top and bobbin. Set for a standard straight stitch and use your standard presser foot.
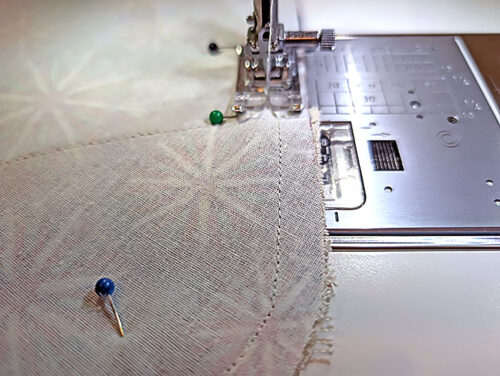
- Stitch along the outer edge of each corner piece within the ½” seam allowance – approximately ⅜” is good.

- Then, edgestitch along the straight edge. Repeat for each piece.

- Trim the excess fabric tips flush with the edge of the pillow.


Assemble, stuff, and stitch closed
- Place the two panels right sides together and pin all around leaving an approximate 4” opening along the base of the triangle for turning and stuffing.
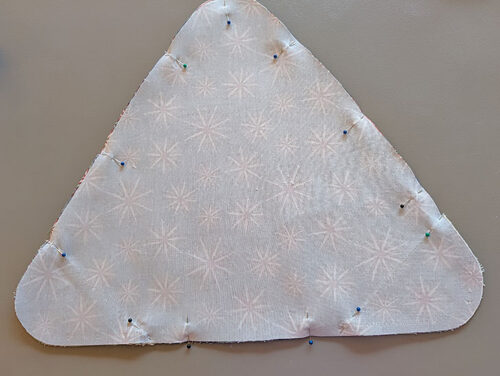
- Be especially careful to align the corner seams front to back.
- We re-set for a slightly shorter straight stitch since our triangle has such lovely curved corners. We are still using our standard presser foot and thread. You could certainly switch to a thread to exactly match your print fabric is you prefer.
- Using a ½” seam allowance, stitch around the entire perimeter of the panels. Remember to stop and lock the seam at either side of the opening left for turning and stuffing.
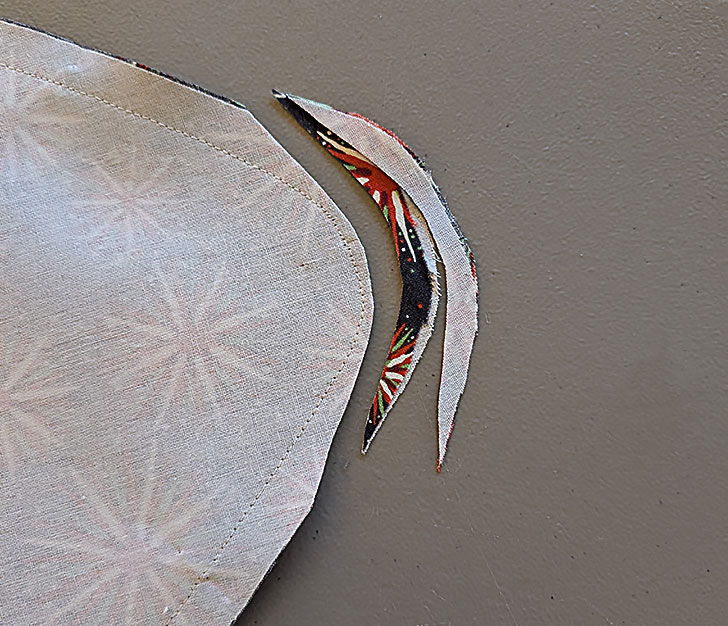
- When the seam is complete, trim the seam allowance around each corner to ⅛” to facilitate a smoother curve when turned right side out. If you’d like more information about the successful sewing of curves, take a look at our full tutorial.

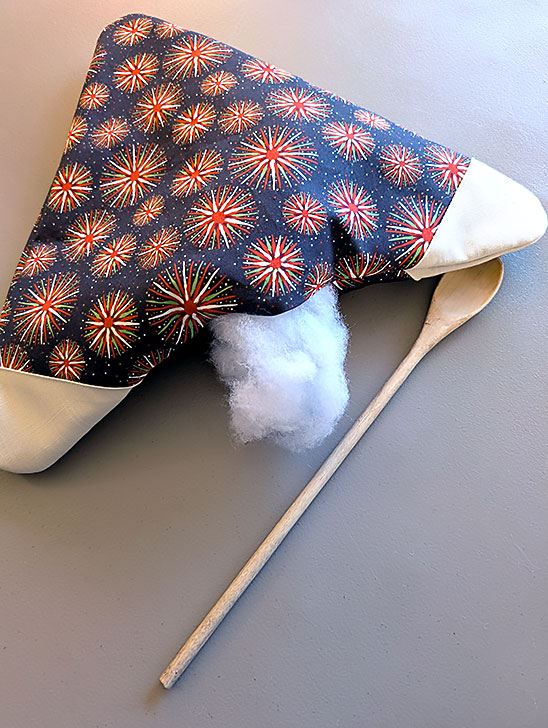
- Turn the pillow right side out through the opening along the base.
- Use a long, blunt tool to smooth the seam all around and to gently round out the curved corners. A chopstick, knitting needle or point turner are classic suggestions, but for the shape of our triangle pillow, we found a wooden spoon was an excellent tool.
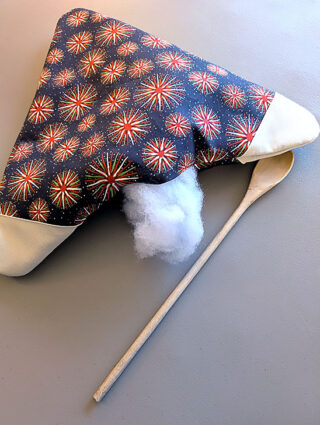
NOTE: Before you start stuffing away, pull out a generous handful of filling. Gently pull the filling loose. The idea is to remove any clumps, while fluffing the fill at the same time. Repeat the process 2-3 times before inserting the filler into the opening at the base of the triangle. We recommend starting the stuffing with the triangle’s corners, working your way into the middle. Don’t over-stuff, the triangle shape looks best when it is a bit flat. We have a full tutorial with our favorite Stuffing Tips + Techniques you can review if you want to become a Stuffing Star. - When your stuffing is complete, turn under the raw edges of the opening so they are flush with the sewn seam and use the standard hand sewing needle and thread to best match the main print fabric to hand sew the opening closed. We suggest a tight ladder stitch for the most invisible finish.

Make and add the corner poms
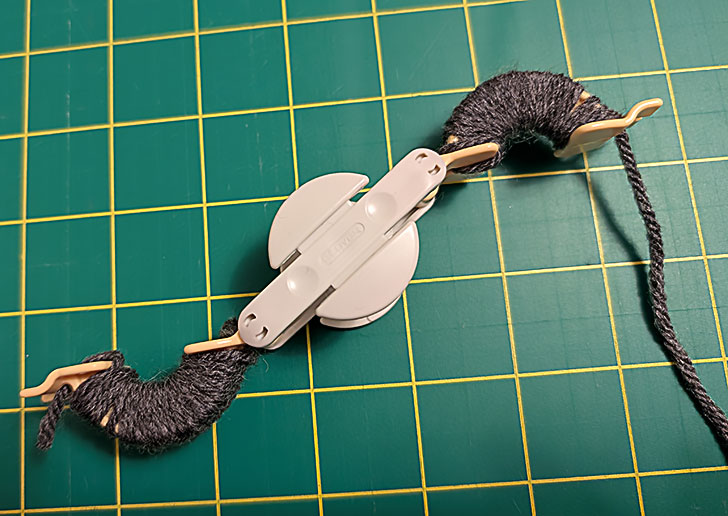
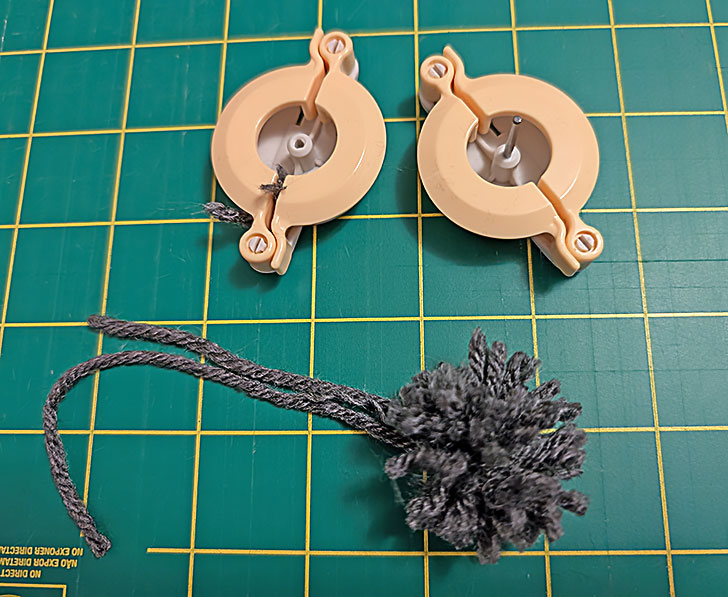
- Find the yarn and pom pom maker. We used the Clover 1⅝” Pom Pom Maker, trimming the finished pom down to an approximate 1½” ball.
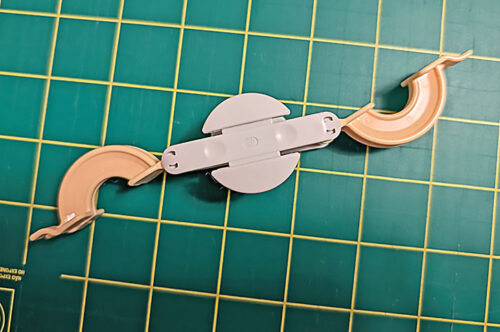
- With our selected worsted weight yarn, we used 20 wraps of yarn on each half of the pom maker.
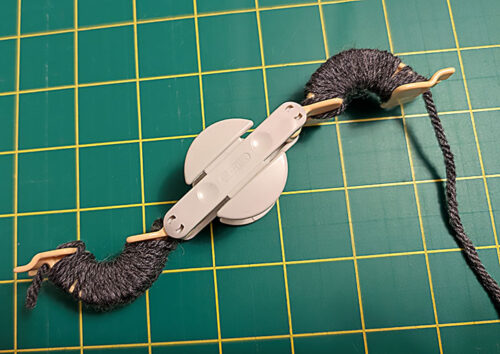
- After wrapping, you’ll close the maker, wrap with a length of “hanger yarn”, trim, and release the pom. We have a full tutorial on using Clover Pom Pom Makers you can review if you are brand new to this type of embellishment.
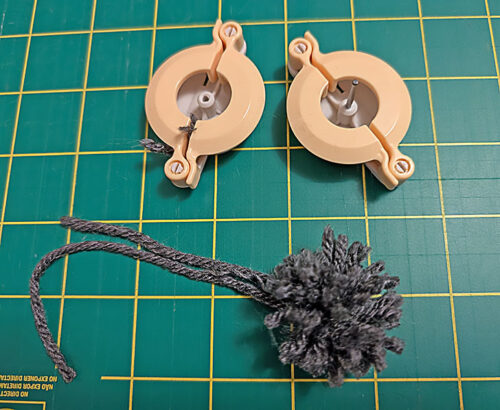
- Fluff and trim the pompom to a nice round shape, then repeat the process two more times to complete your three finished corner poms.
- Using a yarn darner needle or similar large-eyed needle, attach a pom at each corner point. Snug up the pom right against the corner, knot the yarn ends, then feed the needle back through the center of the pom. Slip the yarn off the need and trim the ends to match the rest of the pom. Again, don’t forget to check out our full pom pom tutorial for more detailed steps and photos… it’s really quite simple – and fun!


Lumbar pillow
Interface the panels
- Find the four main rectangle panels: two light and two dark, and the four matching panels of interfacing.
- Place an interfacing panel on the wrong side of each main panel. The edges should be flush all around. Following manufacturer’s instructions, fuse the interfacing in place.
Create and place the accent piping
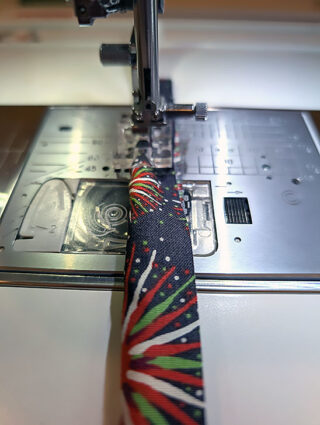
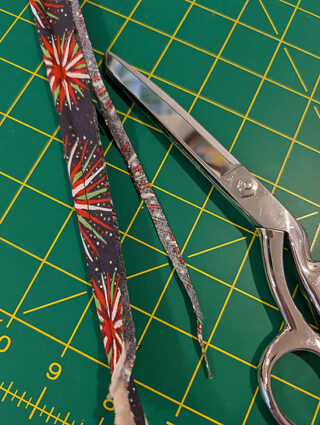
- Find the two 18” bias cut strips of fabric and the length of piping cord. Cut the piping cord into two 18” lengths.
- Wrap one bias strip around one length of cording. The fabric should be right side out and when wrapped, the raw edges of the strip should be flush. Lightly pin the strip in place around the cording.
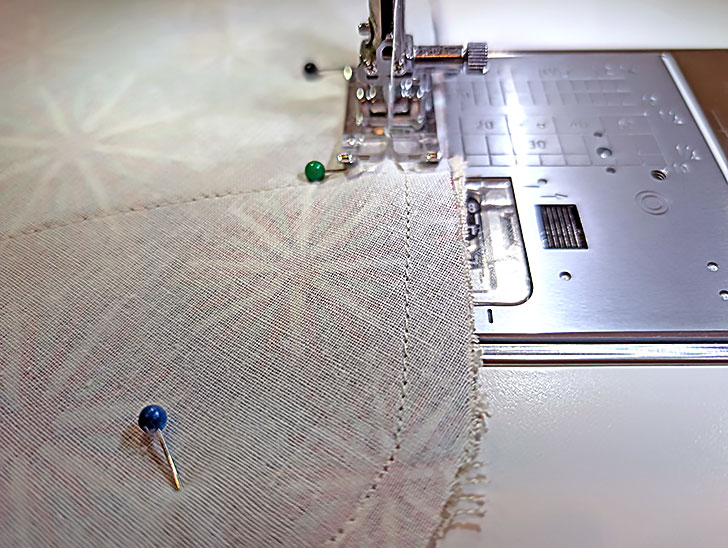
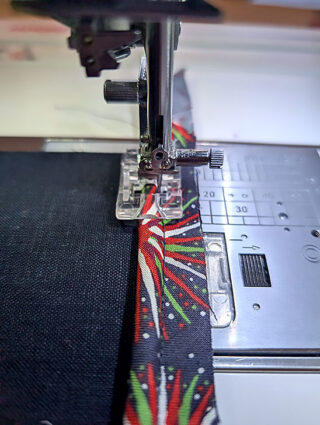
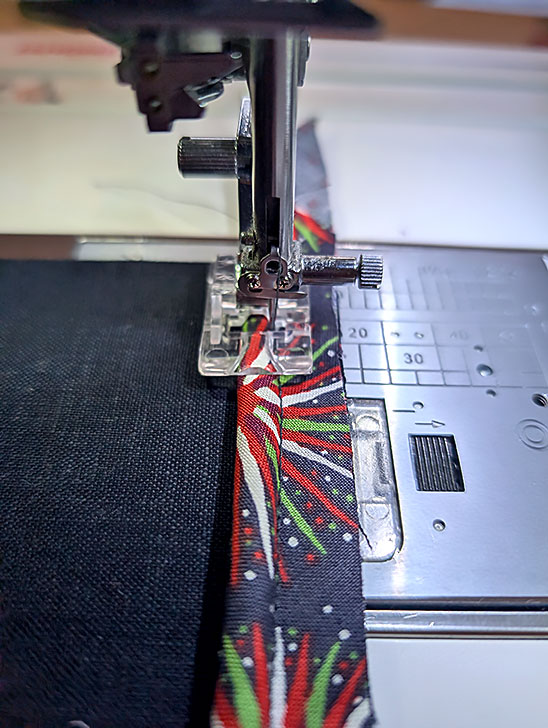
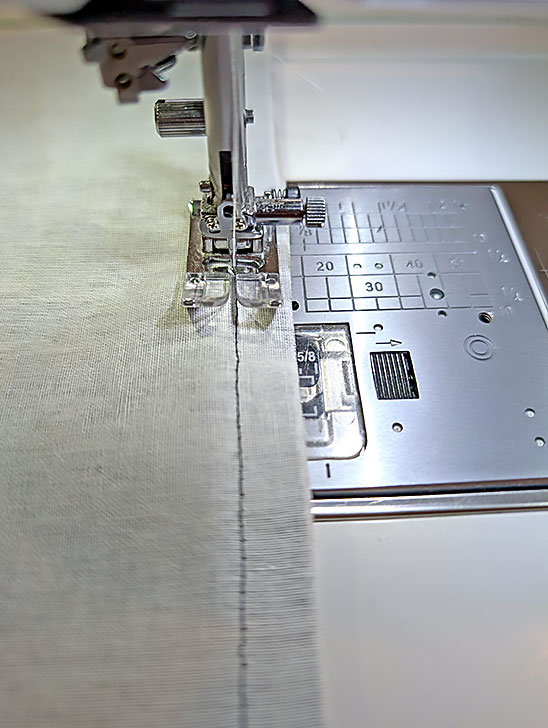
NOTE: As mentioned above in the Supplies list, we used a Janome Wide Groove Beading foot; you could also use a standard Zipper foot or Adjustable Zipper foot - Bring the wrapped cording to your machine and place it under your chosen foot with the cording to the left of the presser foot. Adjust the needle position to stitch close to the right edge of the cording. Use a slightly lengthened stitch. We used a stitch length of 3.0mm and a needle position of 8.0mm. If necessary, re-thread with thread to best match the fabric in the top and bobbin.
- Repeat to create a second strip of piping. On both, trim the seam allowance to ½“.
- Find the two panels of darker color linen, which should already have their interfacing adhered. Center a strip of piping along one 13” side on each panel. The raw edges of the piping should be flush with the raw edges of the linen panel. The piping will extend beyond the linen top and bottom; this is correct and will be trimmed later. Pin in place.
- Continue to use the foot you chose above and the slightly lengthened stitch.
- Position each piping/panel under the foot of the machine and sew the piping to the panel.
- Trim the excess piping flush with the top and bottom of each panel.


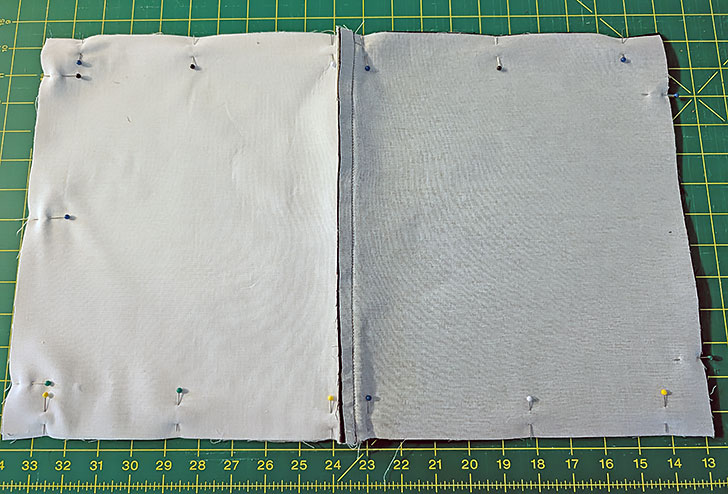
Assemble the pairs of front/back panels, then assemble front to back
- Attach a standard sewing foot and switch back to your default stitch length and needle position.
- Find the two panels of lighter color linen, which should already have their interfacing adhered.
- Place a light panel right sides together with each dark panel, sandwiching the piping between the layers. The raw edges of panels should be flush all around.
- For each pair, work with the dark panel facing up so your original piping seam is visible.
- Stitch together each pair, running your new seam directly on top of the original piping seam.

- Press the seam allowance together and toward the lighter panel.
- At the top and bottom of the seam, gently pull on the piping cord, easing it out approximately ½”. Snip off that ½” , then let go and re-press the seam allowance. This removes the bulk of the piping cord from the final perimeter seam allowance. Smart, huh?

- Place the assembled front/back panels right sides together, matching light to light and dark to dark and paying special attention to aligning the piped seams top and bottom. Pin in place, leaving an approximate 8” opening along one side for turning and inserting the pillow form.
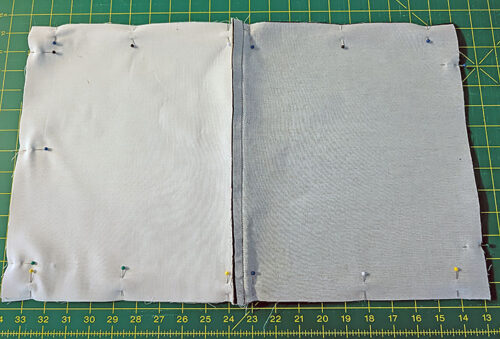
- Using a ½” seam allowance, stitch around the entire perimeter. Go carefully across the center piping seam so the seam allowance stays flat, and remember to stop and lock the seam at either side of the opening left for turning and inserting the pillow form.

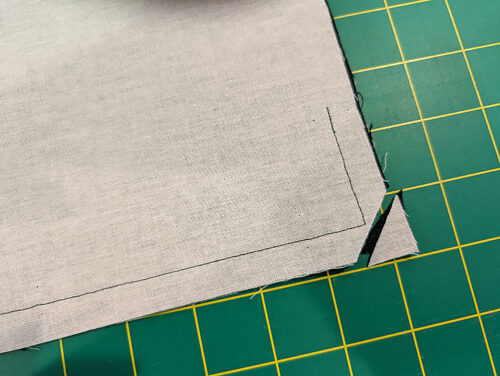
- Trim all four corners at the diagonal to reduce bulk, but don’t cut into your seam line.
- Find the 20” x 12” pillow form and insert it through the opening in the side. Fluff it out in the corners.
- As you did above with the Triangle pillow, turn under the raw edges of the opening so they are flush with the sewn seam and use the standard hand sewing needle and thread to best match the fabric to hand sew the opening closed. We suggest a tight ladder stitch for the most invisible finish.
NOTE: We’ve noticed a trend in the stuffing of commercial pillow forms: the corners are a bit too flat and the centers a bit too tubby. Many commercial forms have a zipper, which you can open up and reach in to adjust the filler, beefing up the corners and flattening the center. If there is no zipper, use your seam ripper to make a small opening along one side, closing it up with hand sewing when your filler adjustment is complete.


Make and add the corner mini tassels
- Our cute accent tassels are a blend of a standard tassel and what we call a Yarn Chubby. The steps for construction and attachment are summarized below, but we also have full tutorials on creating standard Floss Tassels as well as on our original Broomstick Tassels + Yarn Chubbies.
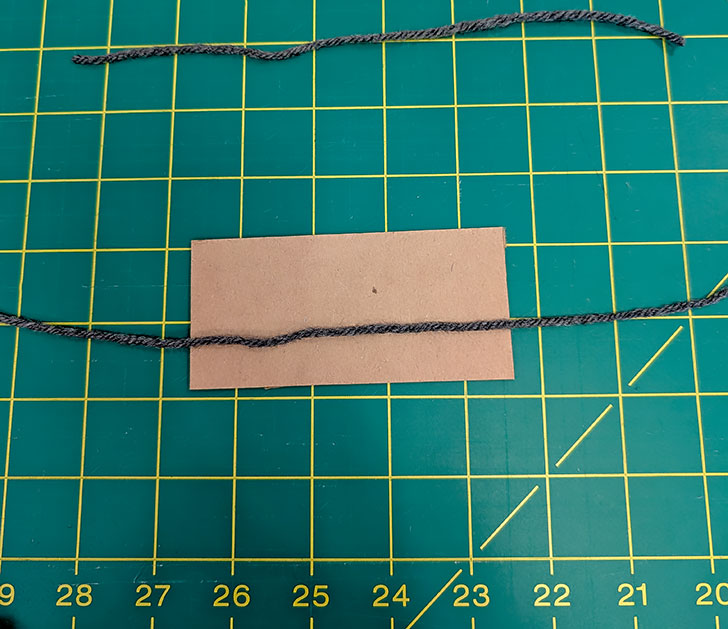
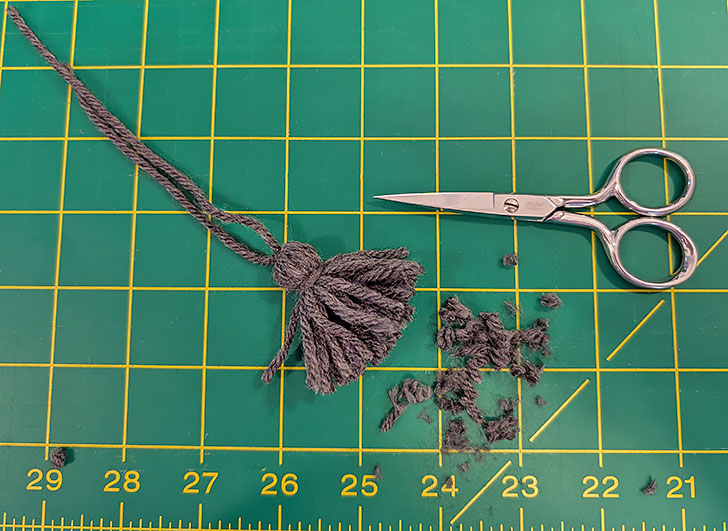
- To start, find your small piece of cardboard, ours was 2” x 4½”. We used the same yarn for the tassels as we did above for the poms.
- From the yarn, cut TWO 9” lengths. Leave one length off to the side. Place the other length across the center of the cardboard.

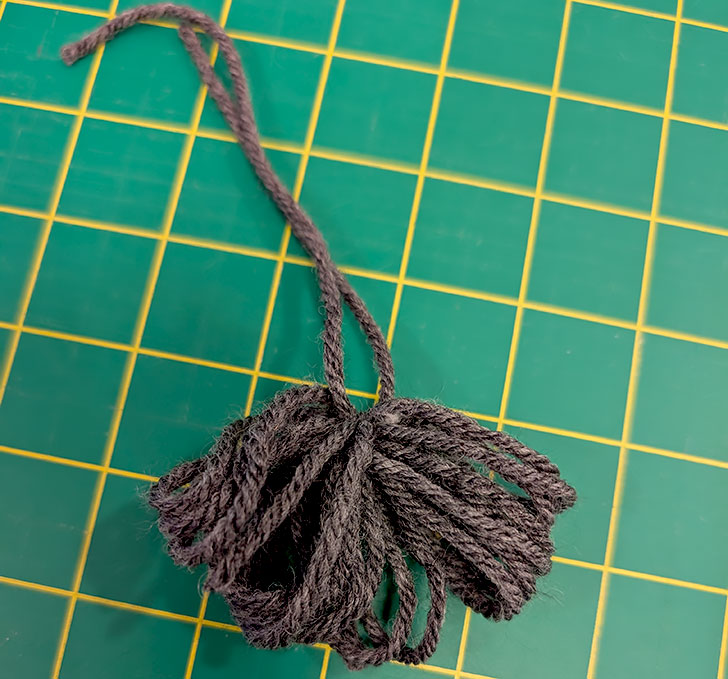
- Circle the cardboard with about 20 wraps of yarn, enclosing the original 9” length of yarn. Tie the tails of the original 9” length of yarn into a knot near the top of the cardboard, drawing together the loops/wraps of yarn.
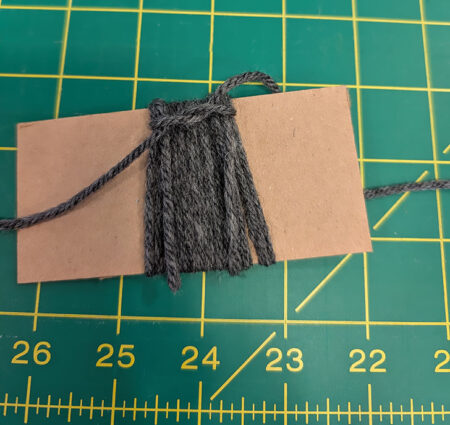
- Slide the yarn off the cardboard.

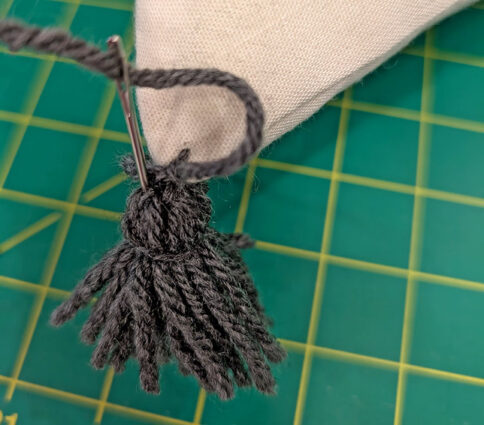
- Take the remaining 9” length of yarn and wrap it around the loops, about ½“ from the top. Knot it tightly to create the “head” of the tassel.
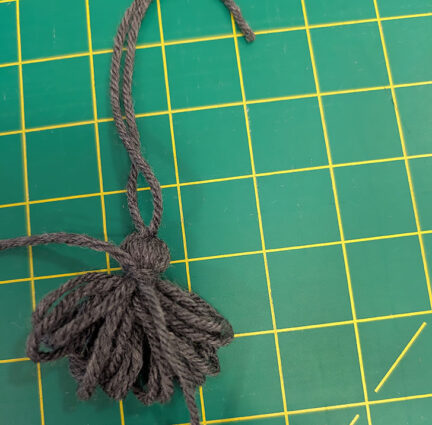
- Cut through the bottom of the loops and trim evenly (the loops as well as the bottom tails of the 9” length you used to create the head of the tassel). Our finished tassels were only about 2” top to tail. You don’t want droopy tassels; they should be pert and fluffy, like a toddler’s first pony tail.

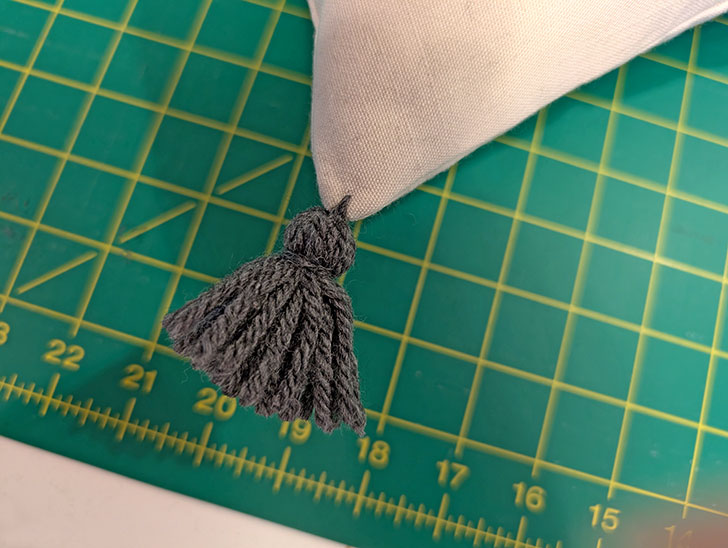
- Use the ends of that original 9” length to secure the tassel to the pillow in the same manner as you attached the poms to the Triangle pillow, using a yarn darner needle.
- Also as you did with poms, feed the tails back through the tassel and trim to match the finished tassel.
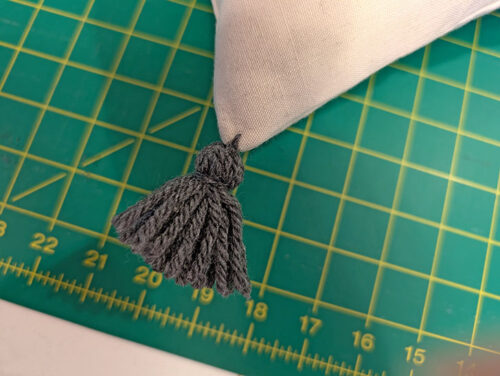
- We added a tassel at each corner as well at at the top and bottom of the center piping.


Project Design: Anne Adams
Sample Creation: Michele Mishler