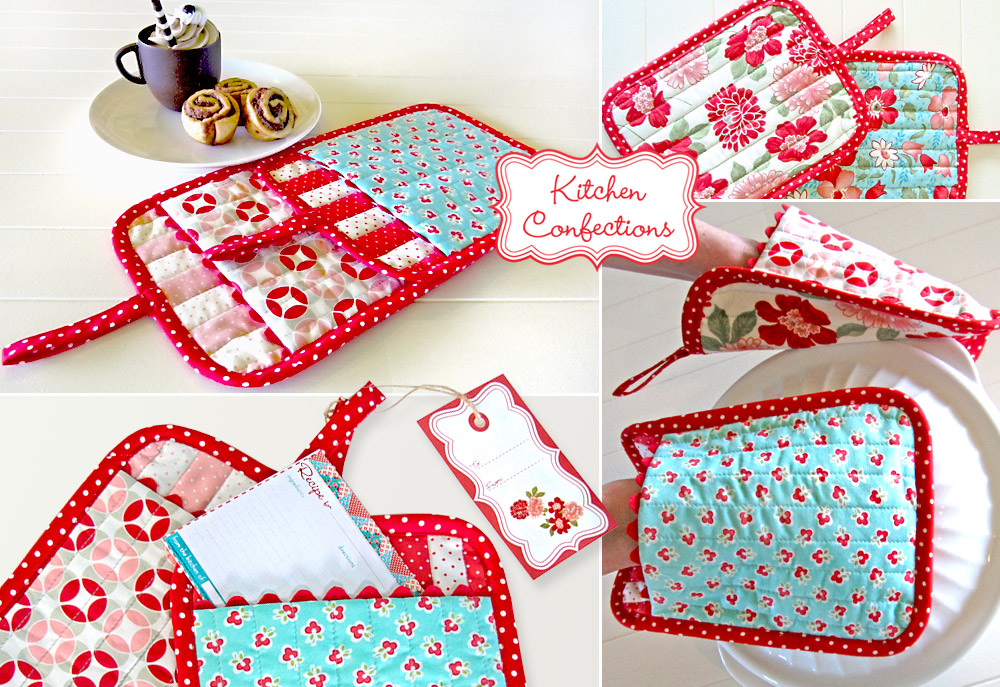
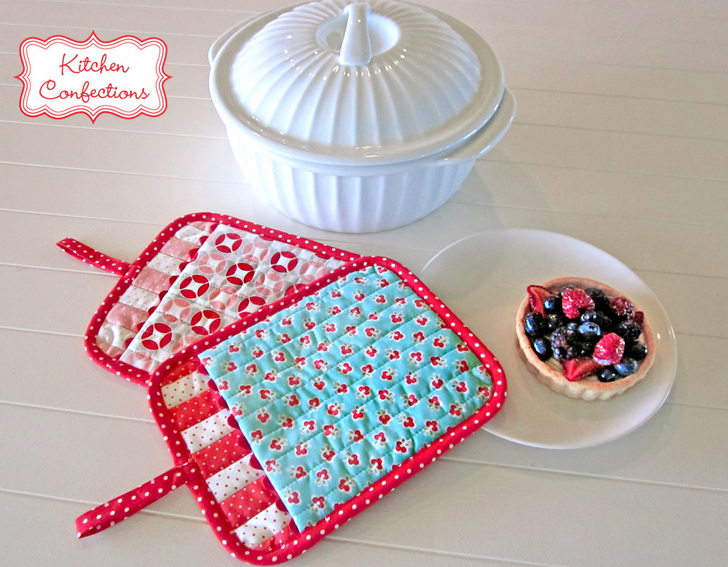
For all our oven-lovin’ S4H fans, these slip-on oven mitts are vintage in shape and style, modern in color and design.
We originally used fabric from the Vintage Modern collection by Bonnie & Camille for Moda Fabrics, an older collection that is no longer readily available. But there are always lots of new quilting cotton collections from which to choose. We also provide yardage calculations with and without pre-cuts in the mix. If you are interested in using pre-cuts, we believe our friends at Fat Quarter Shop have the very best selection.
If you love these napkins, you’ll want to check out the other items in our Kitchen Confection Series: coordinating placemats, matching napkins, a small table runner, and an adorable apron. To round it all out, click to download an adorable set of matching recipe cards and gift tags. You’re sure to brighten your kitchen from top to bottom.
Sewing Tools You Need

- Sewing Machine and standard presser foot
- Quarter Inch Seam foot
- Even Feed/Walking foot with quilt bar; optional, but helpful for the straight line quilting. You could also engage your machine’s built-in fabric feeding system, such as the Janome AcuFeed™Flex system
Fabric and Other Supplies
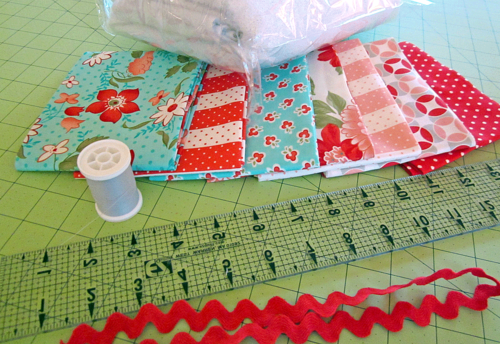
Supplies listed below are for TWO coordinating oven mitts; each finishes at approximately 7″ x 9″ (excluding the loop).
- SEVEN 44″+ wide quilting weight cottons: yardage is shown below both with and without pre-cuts in the mix
- ¼ yard insulated fleece: we used Insul-Bright by The Warm Company
NOTE: If you want extra heat protection, you can use two layers of Insul-Bright. However, you will then need a half yard, and you may also want to consider increasing the width of the bias strips to make it easier to bind the thicker layers. - ½ yard of jumbo rick rack; we used ¾” polyester rick rack in red
- All purpose thread to match fabrics
- Machine quilting thread, 50 wt: we used white
- See-through ruler
- Fabric pencil
- Iron and ironing board
- Scissors or rotary cutter and mat
- Seam gauge
- Seam ripper
- Straight pins
Specific Yardage Notes
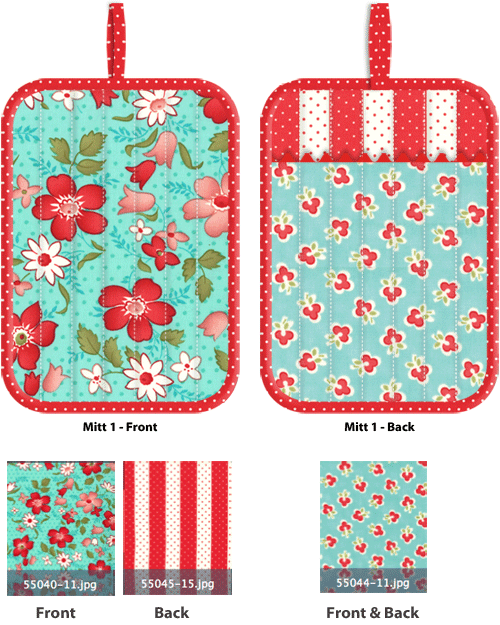
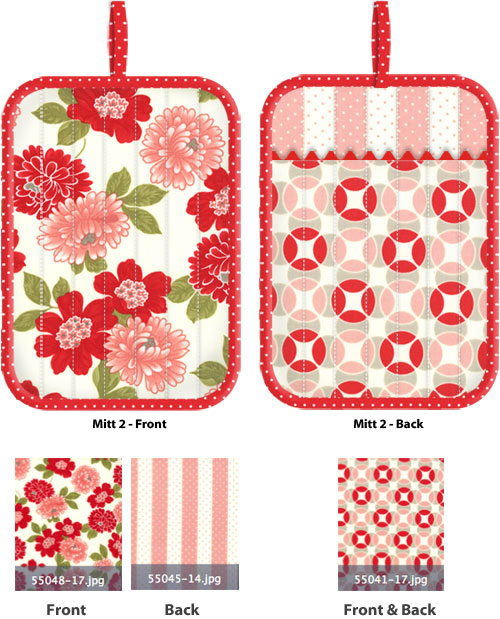
Each oven mitt is made up of FOUR fabrics. The binding is the same on both mitts.
Here is the front/back for mitt #1:
Here is the front/back for mitt #2:
| Fabric Name/Number | Yardage w/out pre-cuts | Yardage w/pre-cuts |
| Fabric 1: Floral Vintage Sky/55040-11 | ⅜ | One Fat Quarter |
| Fabric 2: Floral Dot Stripe Candy Apple/55045-15 | ⅜ | One Fat Quarter |
| Fabric 3: Floral Wish Sky/55044-11 | ⅜ | One Fat Quarter |
| Fabric 4: Floral Cotton Blossom Cream/55048-17 | ⅜ | One Fat Quarter |
| Fabric 5: Floral Dot Stripe Melon/55045-14 | ⅜ | One Fat Quarter |
| Fabric 6: Floral Hopscotch Pebble/55041-17 | ⅜ | One Fat Quarter |
| Fabric 7: Floral Dots Candy Apple/55049-16 | ¼ | ¼ |
Getting Started and Pattern Download
Fabric 1 – Floral Vintage Sky:
Cut ONE 8″ wide x 10″ high rectangle
Fabric 2 – Floral Dot Stripe Candy Apple:
Cut ONE 8″ wide x 10″ high rectangle
Fabric 3 – Floral Wish Sky:
Cut TWO 8″ wide x 10″ high rectangles
Fabric 4 – Floral Cotton Blossom Cream:
Cut ONE 8″ wide x 10″ high rectangle
Fabric 5 – Floral Dot Stripe Melon:
Cut ONE 8″ wide x 10″ high rectangle
Fabric 6 – Floral Hopscotch Pebble:
Cut TWO 8″ wide x 10″ high rectangles
Fabric 7 – Floral Dots Candy apple:
Cut approximately ten 2″ strips on the bias, or simply cut the entire piece of fabric into 2″ strips on the bias. You will need about 65″ overall.
Insul-Bright:
Cut FOUR 8″ x 10″ rectangles
Rick Rack:
Cut TWO 9″ lengths
- Download and print TWO EACH of the TWO patterns: Mitt Front and Mitt Back (Pocket).
Mitt Front
Mitt Back
IMPORTANT: Each pattern is ONE 8½” x 11″ sheet. You must print the PDF files at 100%. DO NOT SCALE to fit the page. There is a ruler on each page so you can confirm your final printout is to scale. Print horizontally (landscape). - Cut out each pattern along the solid line.
- Find the two Mitt Front printouts, flip one printout over so the printed side is facing down. Line up the center line arrows and tape the pattern together to make one complete pattern piece. Repeat with the two Mitt Back (Pocket) printouts.
At Your Sewing Machine & Ironing Board
Layering, quilting and cutting the main front and back pieces
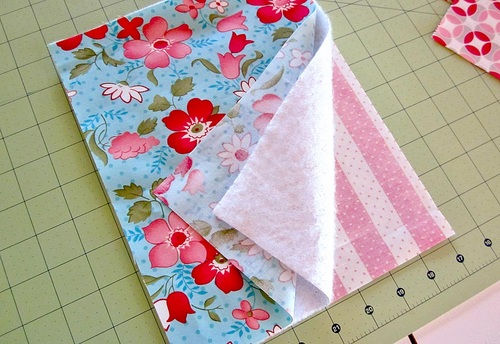
- For each oven mitt front, find your back fabric block, front fabric block and an insulated fleece block. Layer the insulated fleece between the two pieces of fabric. The fabric should be wrong sides together. Pin at the corners to create a ‘quilt sandwich.’
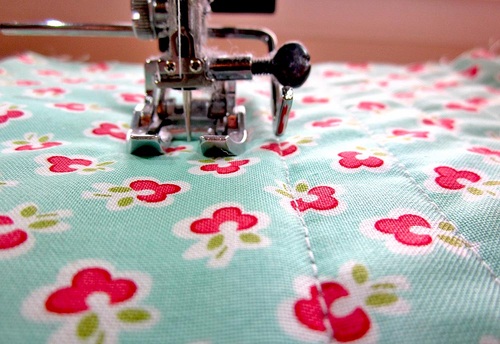
- If possible, attach your Even Feed/Walking foot or engage your machine’s built-in fabric feeding system. Straight-line quilt (sometimes called channel quilting) through all the layers. We used the stripes of our selected fabric as the spacing guide for our lines of quilting. This gave us lines approximately ¾” apart. You can do something similar with the motif on your chosen fabric, use a quilting bar to set an even distance, or pre-draw lines to follow with an erasable fabric pen or pencil.
- For each oven mitt back (pocket), find ONE of the back fabric blocks and an insulated fleece block. Layer the insulated fleece and the fabric wrong sides together.
- As above, channel quilt these layers, matching the width of the quilting on your front piece (in our case, approximately ¾” apart). We used our quilting bar on this piece to keep our lines consistent.
- Using the Mitt Front and Bitt Back (Pocket) patterns you assembled above, center each pattern on the appropriate quilted block and cut out each pattern.
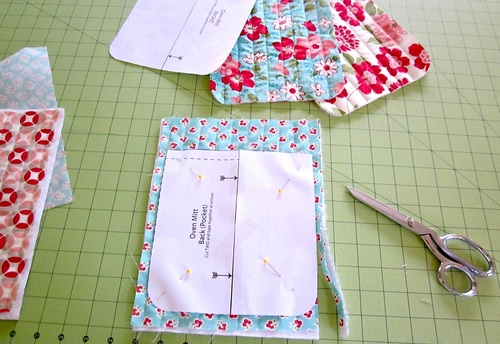
- Use the Mitt Back (Pocket) pattern to also cut a lining piece from the remaining 8″ x 10″ back fabric piece.
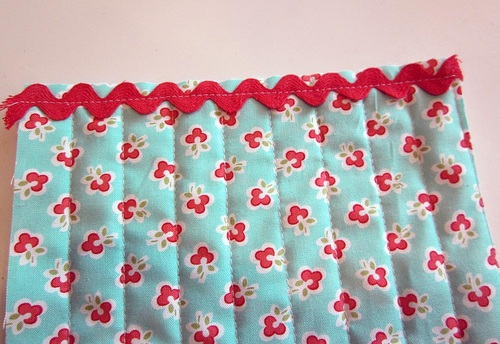
- Find one of the 9″ lengths of rick rack
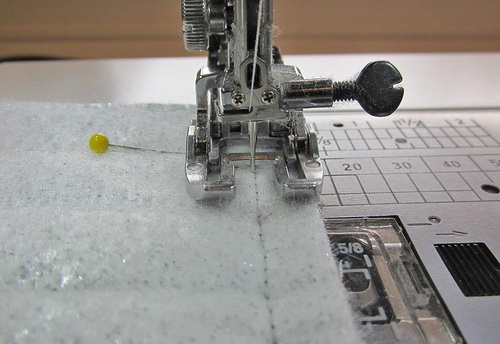
- Place the length of rick rack across the straight upper edge of the quilted oven mitt back (pocket), following the dashed guide line on the pattern. To double check, the center of the rick rack should be ½” from the raw edge of the mitt.
- Machine baste the rick rack in place.
- Find the plain back (pocket) lining piece. Place the quilted back (pocket) right sides together with the lining, sandwiching the rick rack between the layers.
- Stitch the two layers together along the upper edge, following along in the previous basting line for the rick rack.
- Press the seam allowance toward the lining.
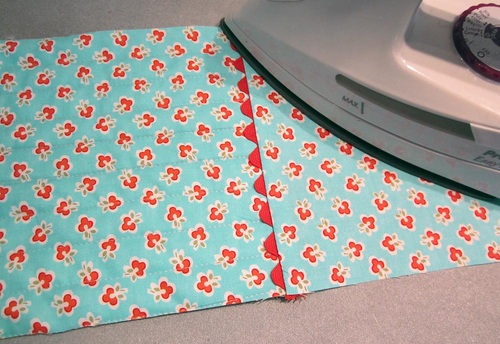
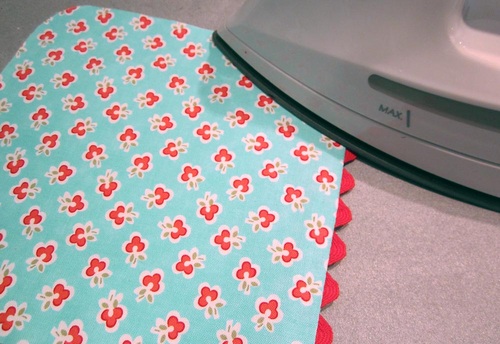
- Fold the lining back so the rick rack now stands straight up and both the front and the back of the pocket have right sides showing. Match the curved raw edges and pin in place. Press.
Assemble front to back and bind with hanging loop
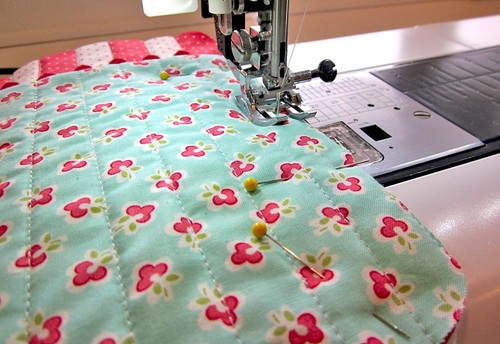
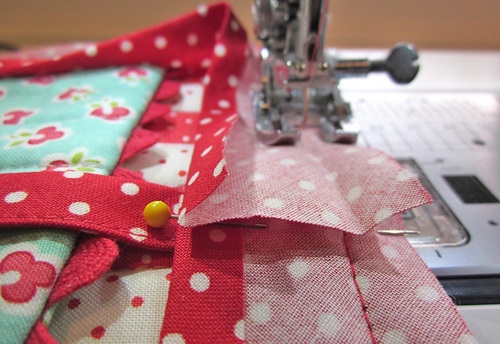
- Place the assembled mitt pocket on the quilted mitt front so the pocket is facing up and sitting on top of the correct side (the inside) of the quilted mitt front. Machine baste the two layers together, staying about ¼” from the raw edge.
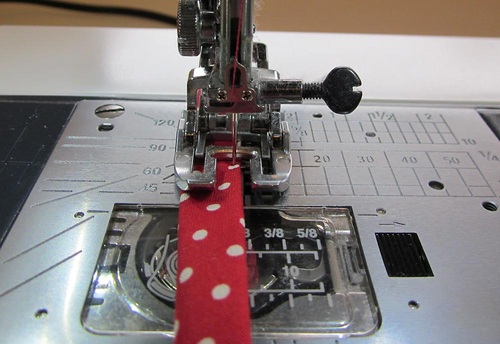
- Find all the 2″ strips of bias strips. Stitch the strips end to end, using a ¼” seam allowance to create one continuous 2″ strip that is approximately 65″ long.
- Create the folded binding with your favorite method. You can use a manual bias tape maker as we did for this project.
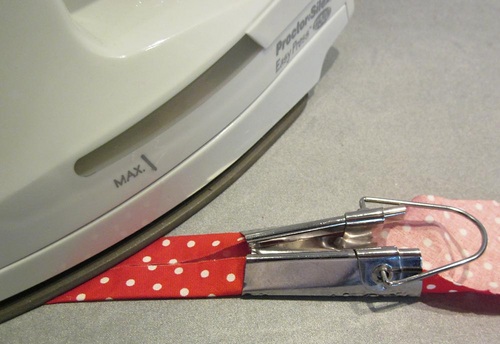
- Or, you can make binding by hand by folding the strip in half, wrong sides together, to create a center crease. Unfold, then fold each side in to meet together at the center crease. Then re-fold again along the original crease line.
- Once your strip is folded into the correct shape, cut two 8″ lengths for the mitt loops.
- Edgestitch each 8″ length of bias tape closed.
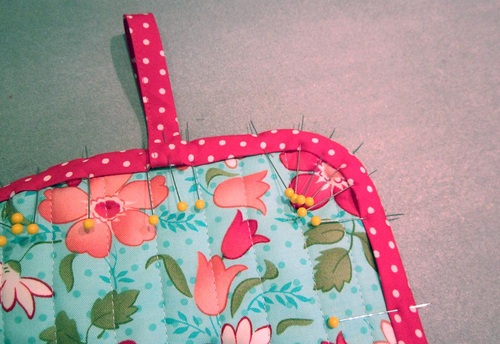
- Pin one raw end of an edgestitched loop to the top of the mitt, centering it above the pocket. Pin in place.
- Working with the entire length of remaining bias tape, unfold the bias tape so it is once again flat but you can see all the crease lines.
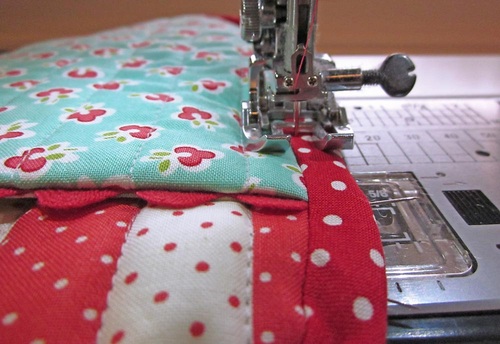
- Starting at the loop, pin the bias tape to the mitt, right sides together, aligning the raw edge of the tape with the raw edges of the mitt and stitching in the fold line of the tape.
- Sew all the way around, stitching along the crease line and starting and stopping at the top with a ½” overlap. You will catch the loop as you sew.
- Trim the excess bias tape flush with the edge of the loop; you will have plenty to use for the second mitt.
- Fold the bias tape to the wrong side of the oven mitt, covering the line of stitching. Pin in place.
- Lift the bias tape loop up from the front, fold it in half towards the back, then tuck the very end (the remaining raw end) under the binding at the back. Pin in place.
- From the pocket side of the mitt, edge stitch the bias tape, making sure to catch the fold on the underside as you sew.
- For extra security at the loop, stitch back and forth a couple of times across the loop at the outer edge.
- Repeat to attach the remaining binding and loop to the second mitt.
NOTE: If you’re new to working with bias tape, the number one rule is ‘slow and steady wins the race.’ You’re sewing around a curve, which is trickier than a straight line and are binding several layers. Don’t fear the pin! Use plenty, removing them as you go. For more hints, check out our tutorial: Bias Binding: Figuring Yardage, Cutting, Making, Attaching.
Project Design: Alicia Thommas
Sample Creation and Instructional Outline: Michele Mishler