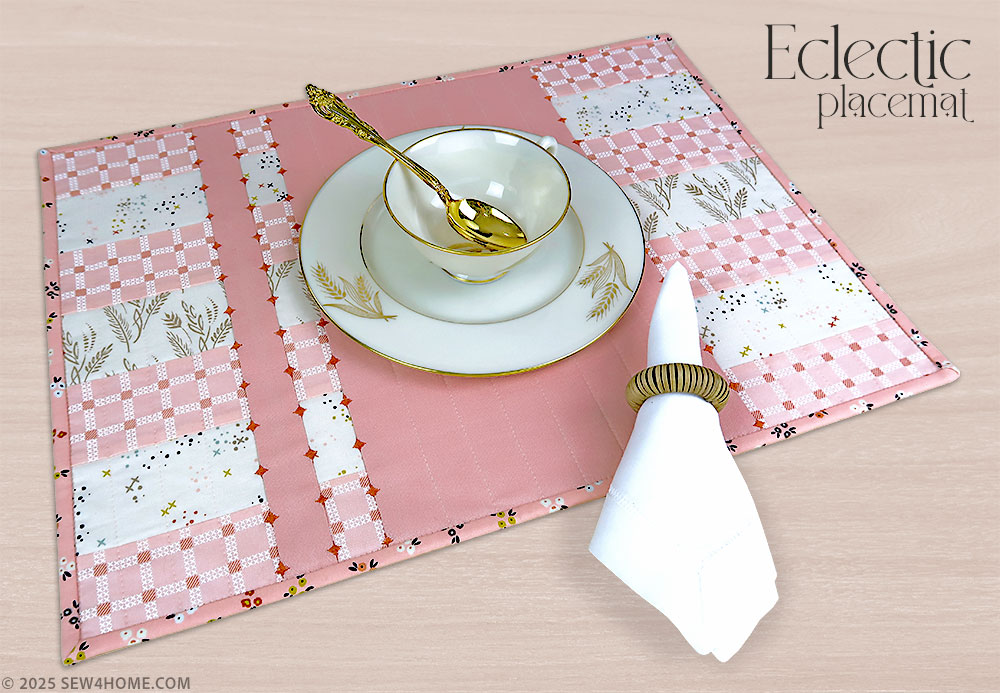
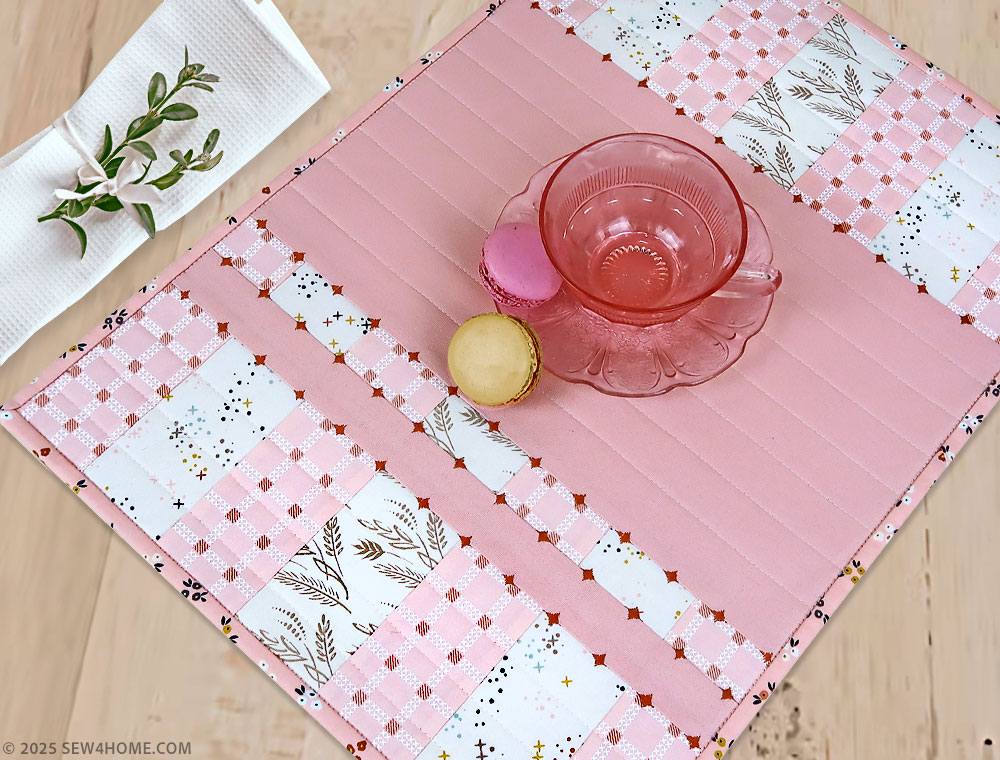
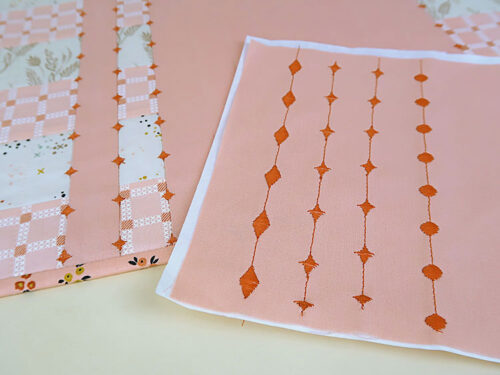
When there are so many great techniques in one placemat, it can be challenging to pick a favorite. Do we call out the unique decorative stitching? The straight line quilting? The patchwork featuring Jelly Roll strips? The itty bitty binding? They’re all good-to-know features within the project, but perhaps most important is how they all come together in an eclectic fusion of method and style.
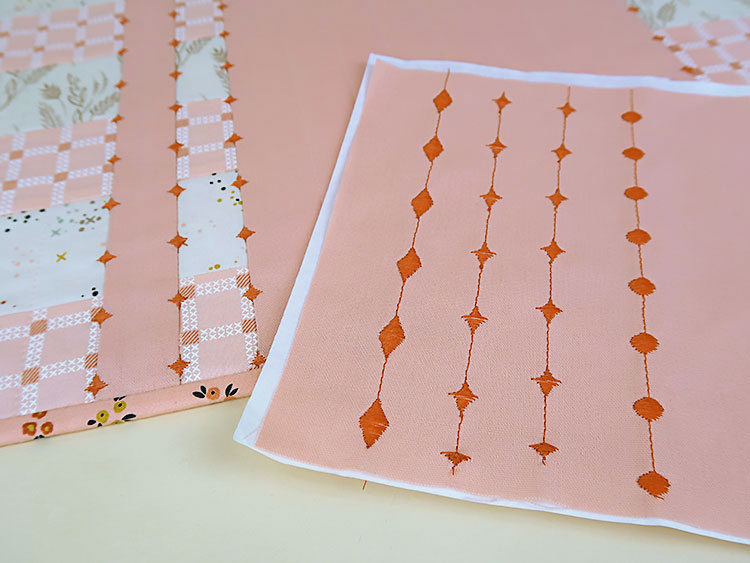
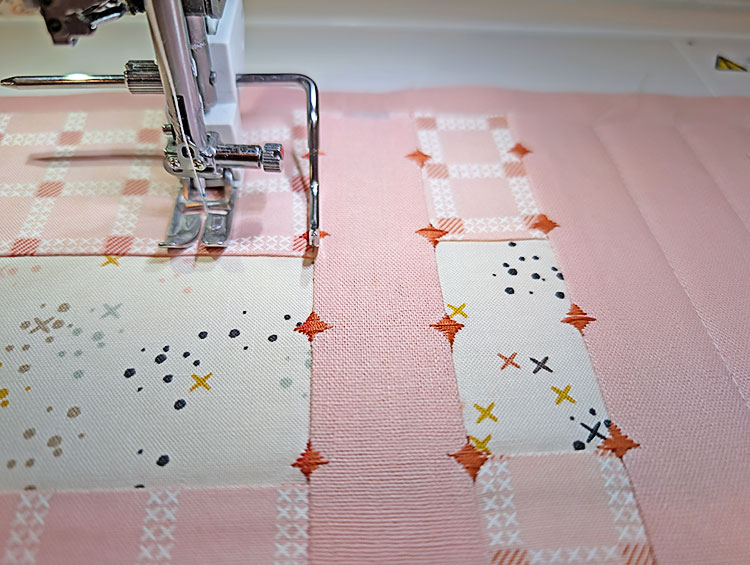
What is likely to first catch your eye are the four lines of decorative stitching across the front of the placemat. The stitches almost look as if they are hovering over the patchwork seams. You may at first assume this is a standard stitch-in-the-ditch technique, but the spacing of nearly an inch between the stitches isn’t the traditional look you can achieve with that method. Instead, we show you how to combine a decorative stitch with several straight stitches, then use that combination to actually sew the ¼” patchwork seam. When you open the seam right side up, voila! the look of beautifully spaced stitches. We’ve included a short video within the instructions below to show how the decorative seaming trick works.
As a Janome America sponsored project, we used a number of specific Janome stitch settings to create this effect. Any machine with the ability to memorize stitches or any machine that includes an alphabet feature can produce this result. Not a Janome sewer? We humbly think you should be, but your machine make and model may have similar stitch-combining options.
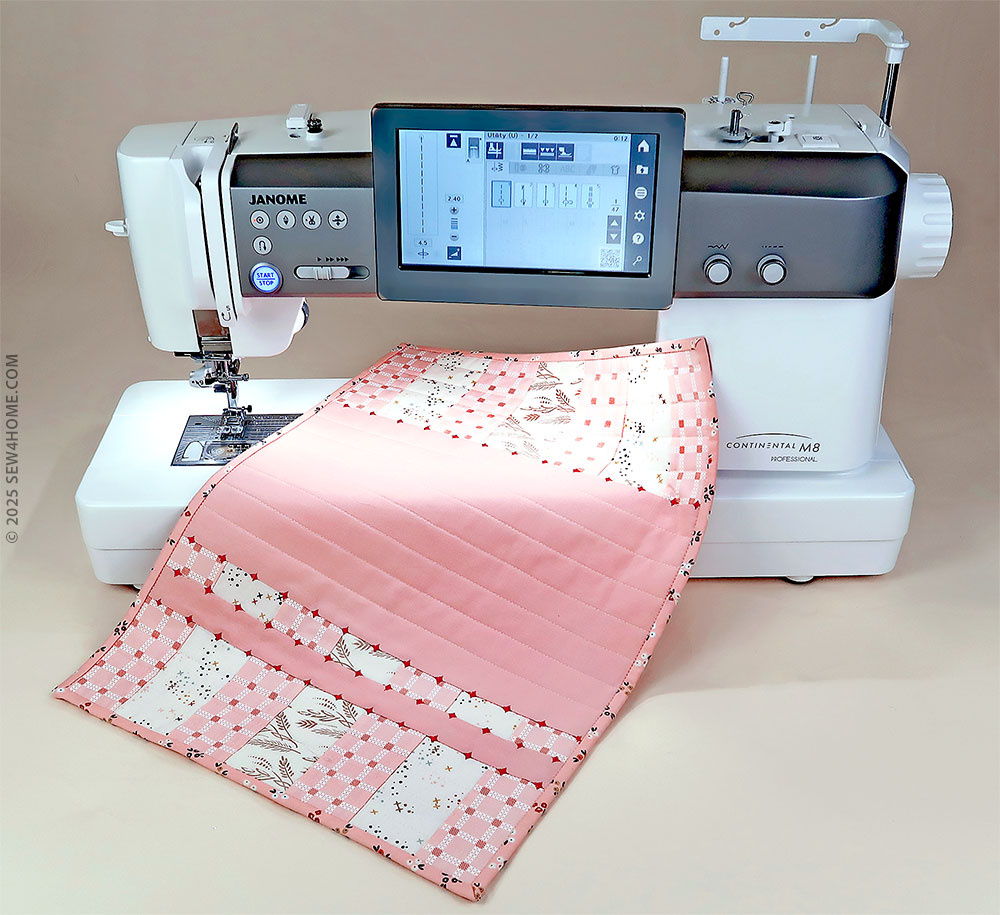
If you have one of the more advanced Janome models, such as the Continental M8 Professional we are highlighting here, this stitch technique is built-in! Check your manual for the section on Mirage Stitches to see how to apply Mirage Stitches to one layer or two layers of fabric.
We’re all creatures of habit by nature, and it can seem intimidating to explore something new. Janome makes the process very intuitive and it’s really quite fun to give it a try. We have extra steps and photos to help, and as mentioned, even a little video example. The process is simple but the finish is stunning, and it’s yet another example of the emphasis Janome places on having the best stitch flexibility and precision in the industry.
As with any decorative stitch embellishment, take the time to practice the style of stitch as well as length and width. You need to select a stitch pattern that is symmetrical – equal on both sides, so when the seam is opened, the pattern is balanced. We do really follow our own suggestions; in a photo above, and below within our instructions, are some of our practice rounds as we narrowed down to the final choice.
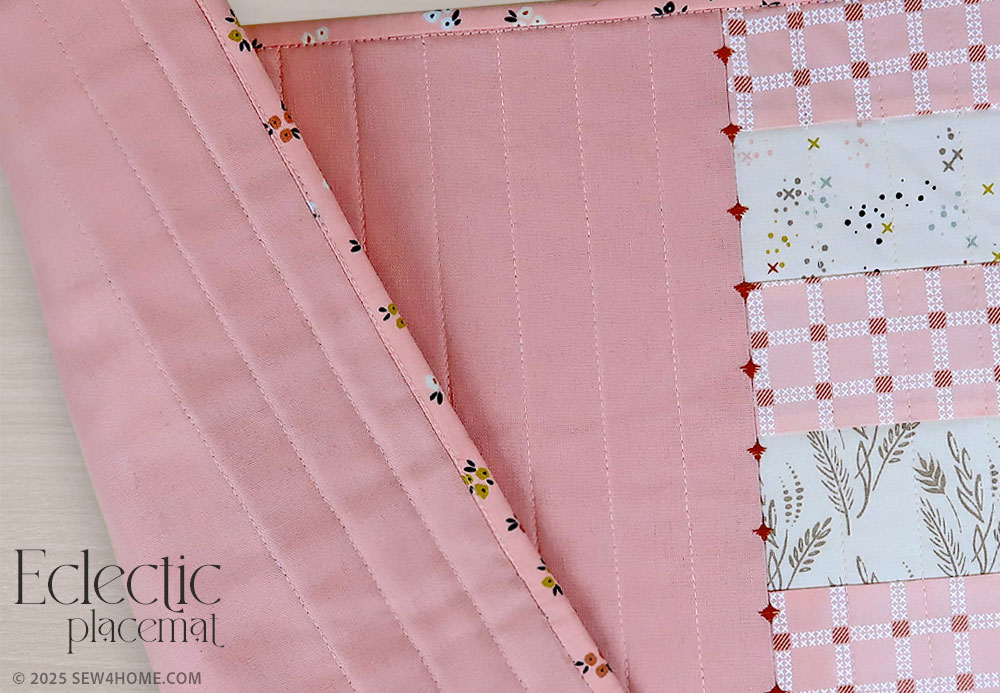
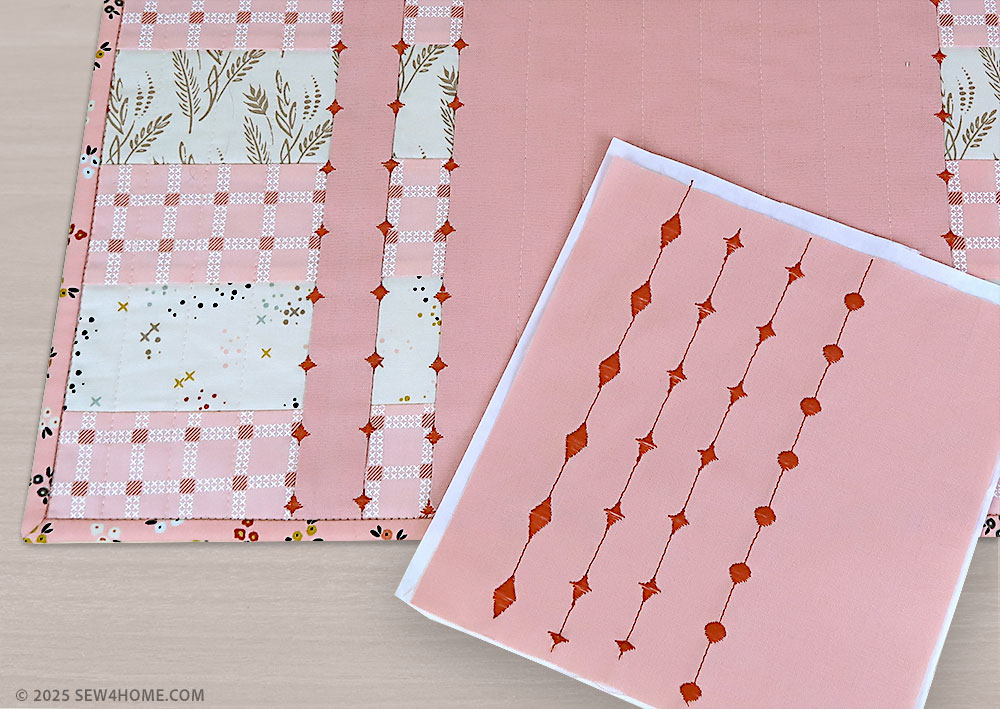
We’re always looking for ways to use precuts and this placemat design is a perfect opportunity. The colorful side panels and the extra narrow binding are cut from Jelly Roll strips. That binding is indeed narrow, but is still formed with a traditional double fold wrap. This adds just the bit of extra weight needed to make sure the placemat lays nice and flat on your table. Too lightweight and the edges of the mat want to curl.
You’ll add a little yardage in a coordinating solid for the center patchwork sections and the back panel. We used a fine linen but a standard quilting cotton would work just as well.
Our thanks again to Janome America for their support of this project and many of the other most popular projects across the S4H site. To understand first-hand why we are a Janome Exclusive Studio, we invite you to visit a local Janome dealer for an in-person test stitch on the machines we consider to be the best in the industry. To find out more before you go, visit the Janome website and follow them on social media.
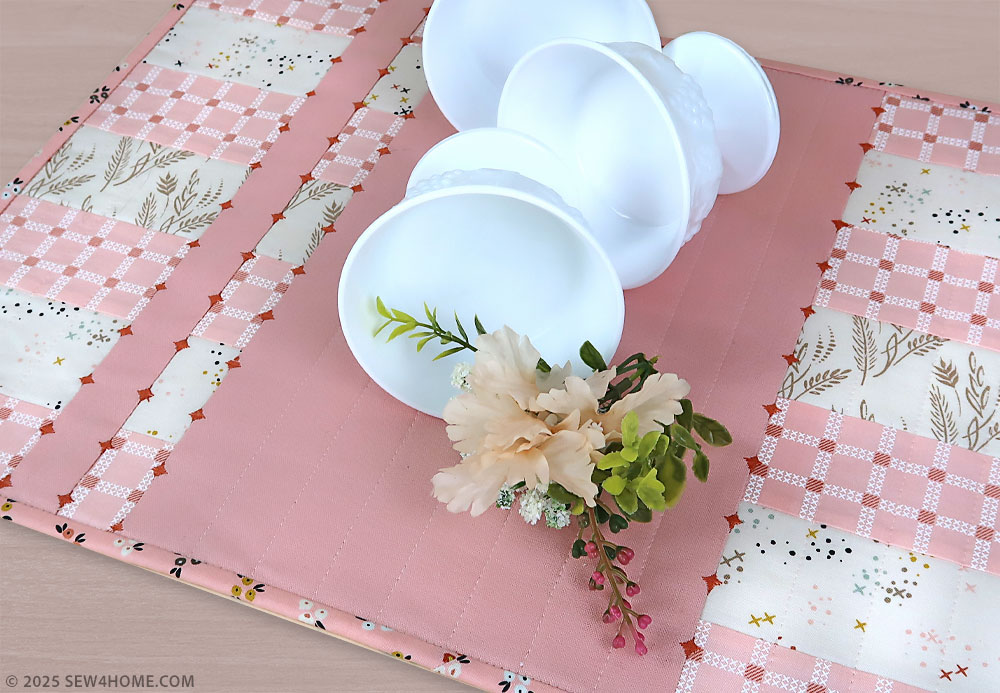
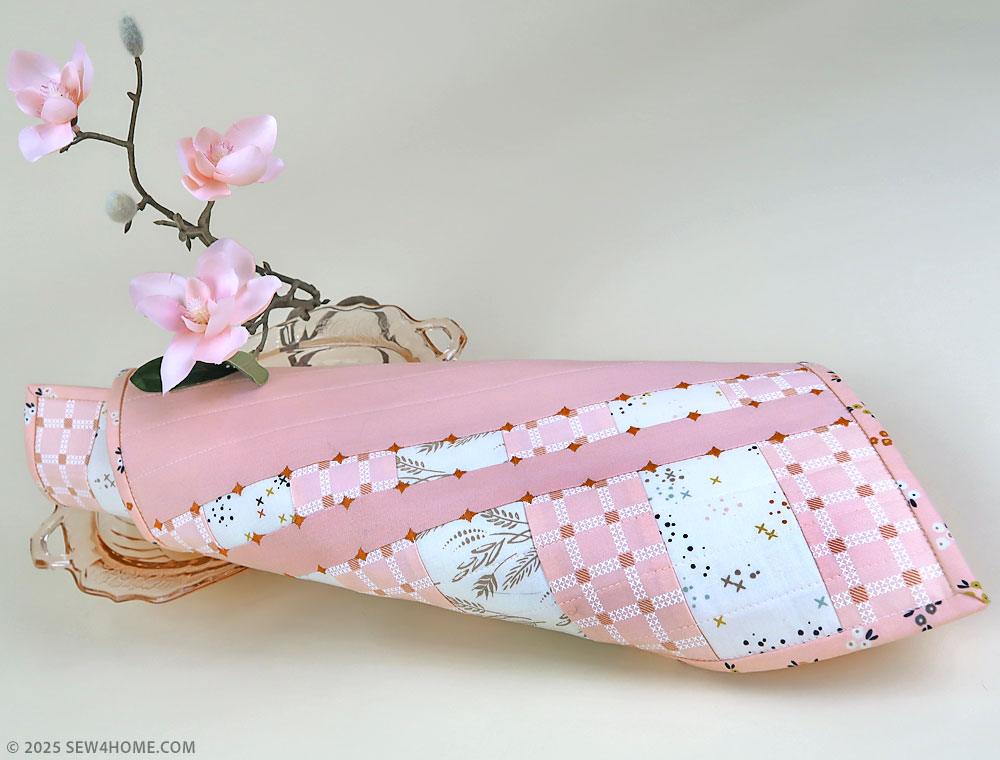
Our Eclectic Placemat finishes at approximately 19” wide x 14” high.
Sewing Tools You Need

- Sewing Machine and standard presser foot
- Quarter Inch Seam foot
- Even Feed/Walking foot or engage your machine’s built-in feeding system; we used the Janome AcuFeed™ Flex built-in fabric feeding system
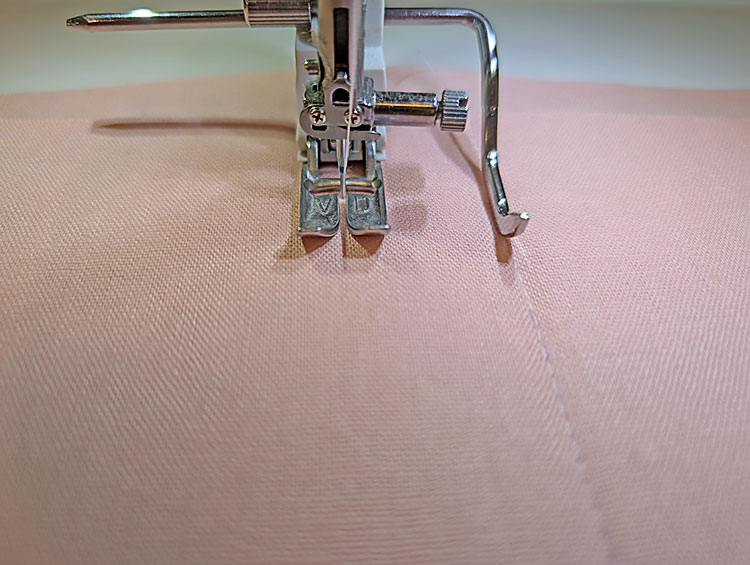
NOTE: As you’ll see within the instructions below, the AcuFeed™ Flex system with the narrow VD foot was our choice for the decorative stitch seams. This Janome foot is exactly ½” in width – ¼” to either side of the center needle drop – which made it perfect for maintaining the ¼” seam that resulted in the “floating” stitches. You can certainly opt for a standard Quarter Inch Seam foot.
- Quilting Guide Bar; optional but helpful for the precise 1” straight line quilting; we used it in combination with the AucFeed™ Flex system and the narrow VD foot.
Fabric and Other Supplies
NOTE: Supplies shown are for ONE 19” x 14” placemat. Multiply as needed to fill your table.
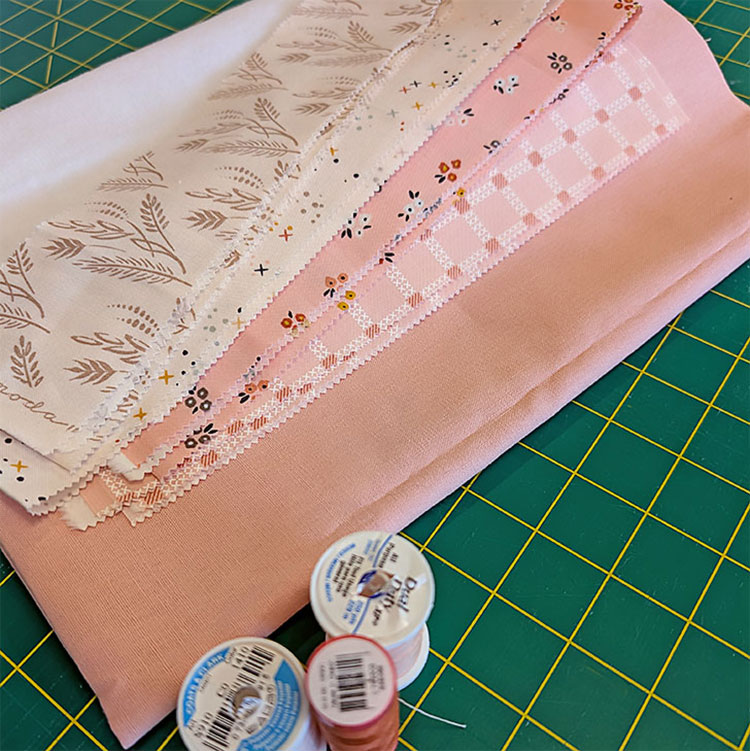
- SIX Jelly Roll strips; we used strips from the Dawn on the Prairie collection by Stephanie Sliwinski of Fancy That Design House for Moda Fabrics – if you do not wish to use Jelly Roll Strips, you will need SIX 2½” x 44” strips cut from your own yardage. In the world of patchwork, you can always choose your own cuts and combinations. To create the same look we did, you will need the following:
TWO Jelly Roll strips for your dominant pattern – the pink squares in our sample, which is Carnation Stitch Check from the Dawn on the Prairie collection
ONE Jelly Roll strip for your primary companion pattern – the spatter print in our sample, which is Unbleached Shadow Stitch Confetti from the Dawn on the Prairie collection
ONE Jelly Roll strip for your secondary companion pattern – the beige wheat print in our sample, which is Unbleached Grasslands from the Dawn on the Prairie collection
TWO Jelly Roll strips for the binding – we chose Carnation Sweet Ditsy from the Dawn on the Prairie collection - ½ yard of 44”+ wide fine linen or quilting weight cotton in a solid to coordinate with your chosen Jelly Roll Strips for the front patchwork as well as for the entire back panel; we used Essex Linen in Rose Bud
- ½ yard of 45” + wide fusible fleece; we used Pellon Thermolam Plus one-sided fusible fleece
- Tear away stabilizer; we used adding machine tape! It was the perfect width and easily tore away from our stitching, but a standard tear away stabilizer cut into strips would work as well
- All-purpose thread to match fabric for construction; you need thread to match your solid fabric and thread to best blend with your Jelly Roll strips; we were lucky that a pale pink worked for both
- All-purpose thread to in a contrasting color for the decorative stitching; we used a warm rust that echoed a color within the binding strip and blended with yet still stood out from the other fabrics
- See-through ruler
- Fabric pen or pencil
- Iron and ironing board
- Scissors
- Rotary cutter and mat
- Seam gauge
- Seam ripper
- Straight pins
Getting Started
- From the dominant pattern Jelly Roll strips (Carnation Stitch Check in our sample); cut FOUR 12” strips.
- From the primary companion pattern Jelly Roll strip (Unbleached Shadow Stitch Confetti in our sample); cut TWO 12” strips.
- From the secondary companion pattern Jelly Roll strip (Unbleached Grasslands in our sample); cut ONE 12” strip.
- From the solid fabric (Rose Bud Linen in our sample), cut ONE Width of Fabric (WOF) x 15” high panel, then from this panel, sub-cut ONE 20” wide x 15” high rectangle.
- Trim the remaining panel down to 14” in height, and sub-cut the following:
ONE 8⅝” wide x 14” high rectangle
ONE 14” x 1⅝” strip - From the fusible fleece, cut ONE 19” x 14’ rectangle.
At Your Sewing Machine & Ironing Board
Make the strata
NOTE: A strata, when used as a quilting term, is simply strips of fabric sewn together to create a larger panel. The assembled strata is made slightly oversized than absolutely needed so it can be squared up, then cut into the desired sections. The strata for this placemat needs to be large enough for 11” cuts, so 12” strips would be sufficient. As you’ll see within our instructional photos, some of our strips are slightly different sizes. This was due to the exact number of Jelly Roll strips we had to work with. Our favorite pink check was limited to just one 44” strip so we needed to carefully cut these four strips at 11” rather than 12”. Where there’s a will, there’s a way, right? If possible, work with multiple strips as listed above so you can cut all your strips at 12”.
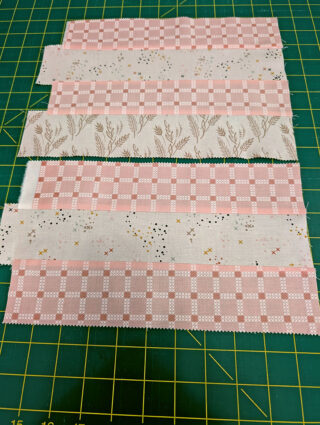
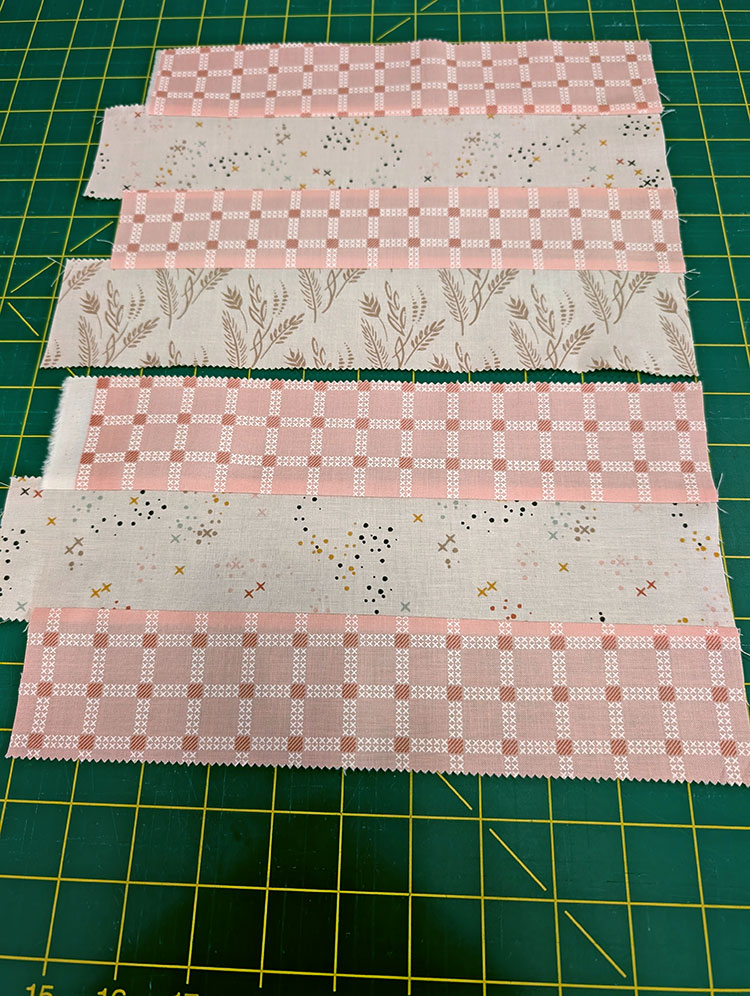
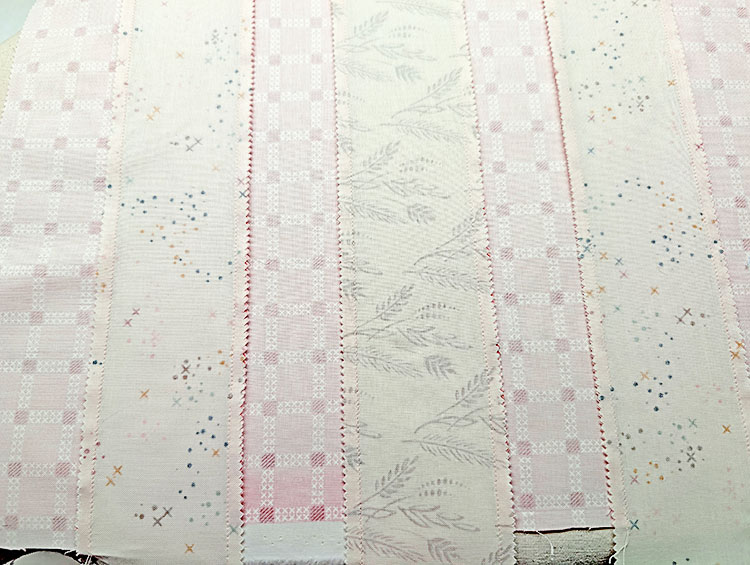
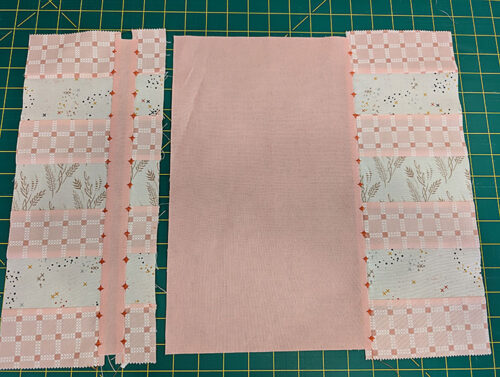
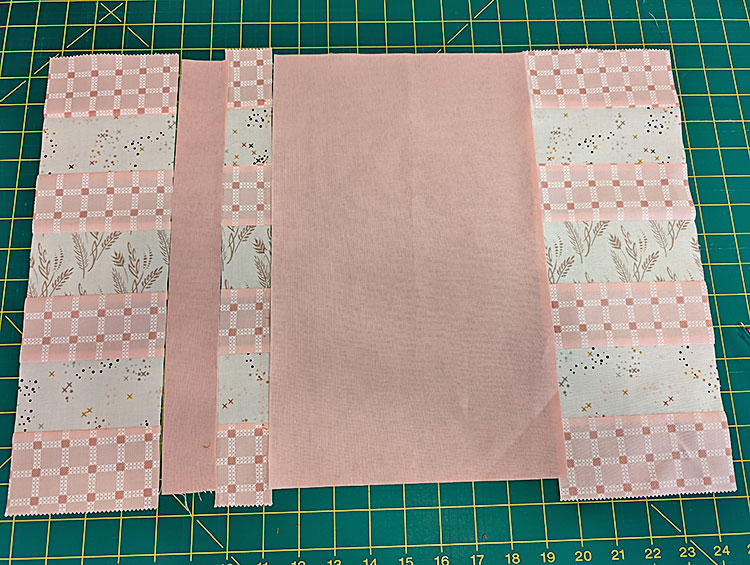
- To create our look, arrange the strips as shown below. Our dominant pattern was a distinct checkered grid, so we were careful to align the checks top to bottom. We also had one directional print, the Grasslands, so we made sure it was facing up.
- Thread your machine with the matching construction thread in the top and bobbin and attach a Quarter Inch Seam foot.

- If possible on your machine model, adjust the settings for patchwork.

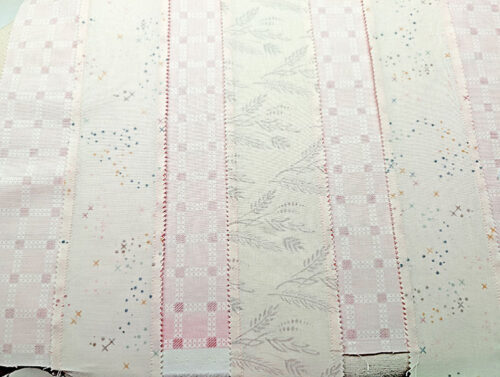
- Working from top to bottom, and using a ¼” seam allowance, first stitch the strips together in pairs: check-to-print, check-to-print, check-to print.
- Next, use a ¼” seam allowance to sew together the three pairs, and finally, add the bottom strip to complete the strata, staying with the ¼” seam allowance.

- Press all seams toward the dominant strip (the check in our sample).
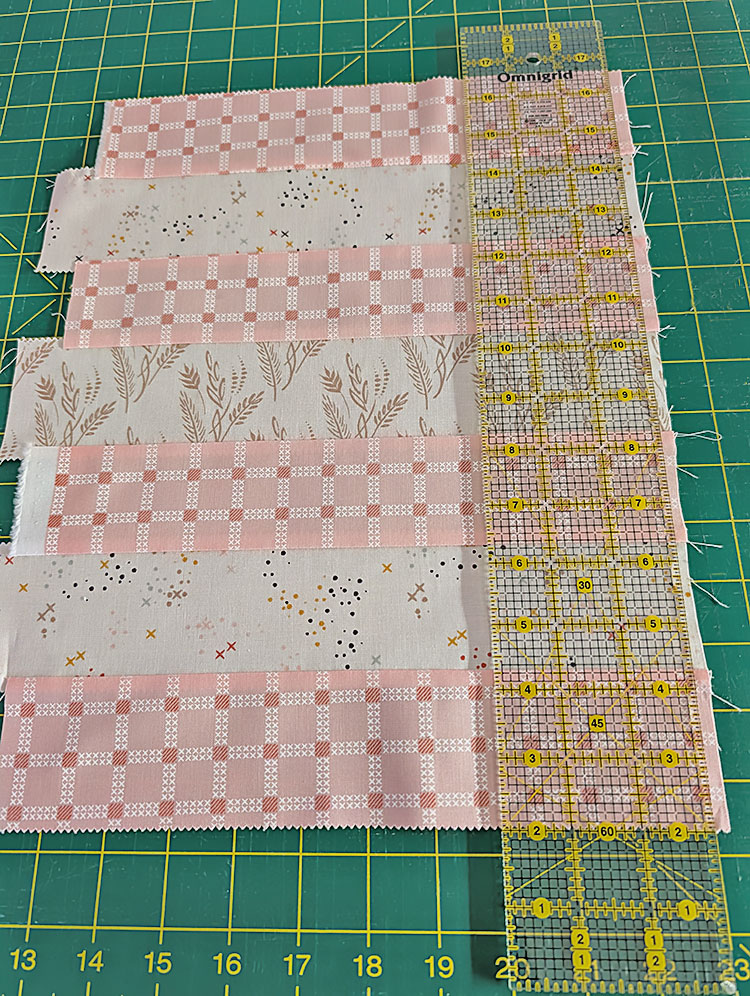
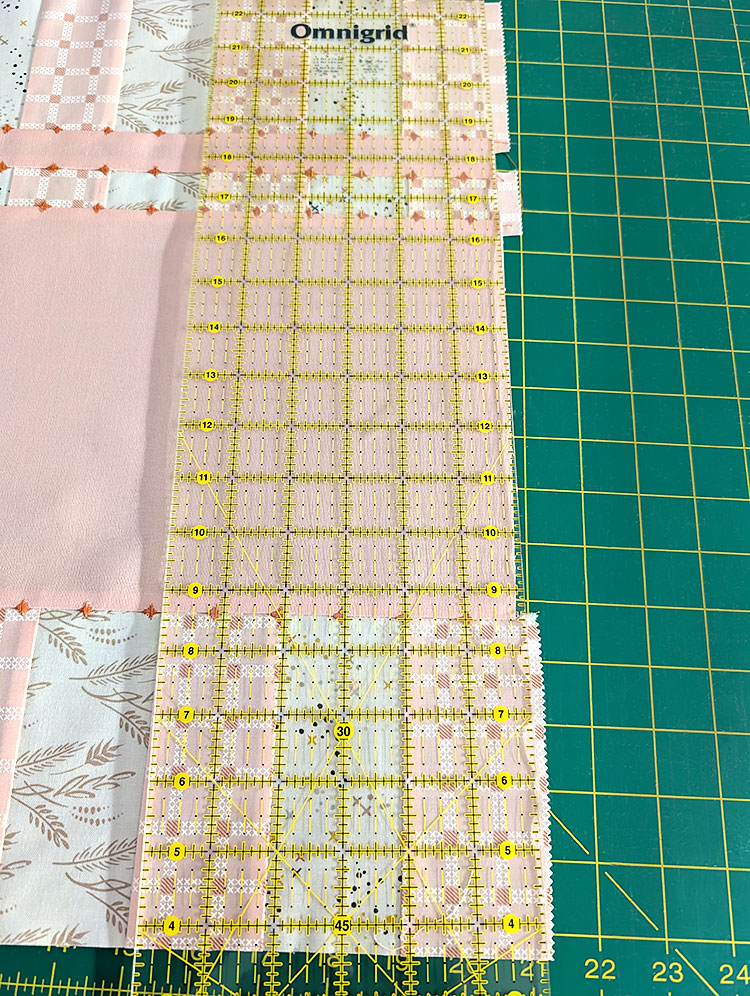
- Trim both sides of the strata so the edges are flush. A see-through ruler and rotary cutter is best for this; scissors are not likely to give you as straight a slice.
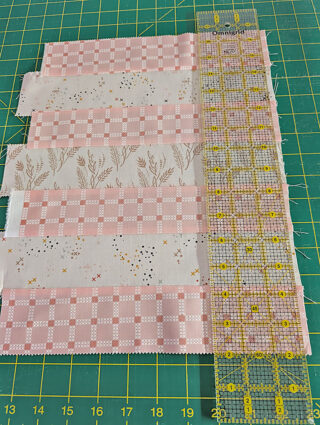
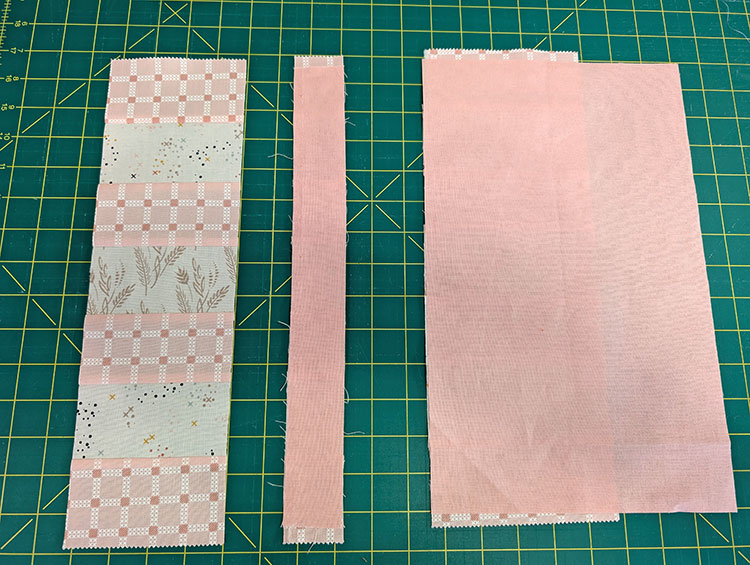
- From the finished strata, cut the following:
ONE 1⅝”wide strip
ONE 4¼” wide panel
ONE 5¼” wide panel
Create the decorative seams
Setting up for success
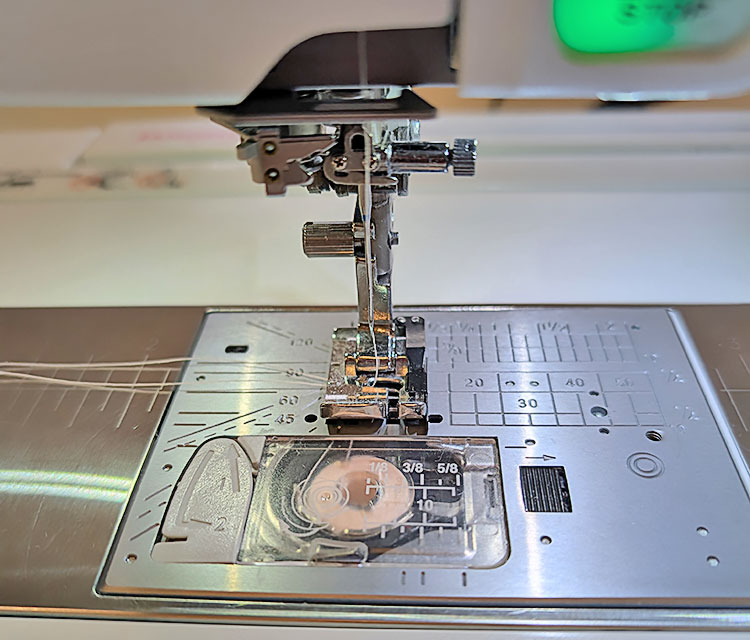
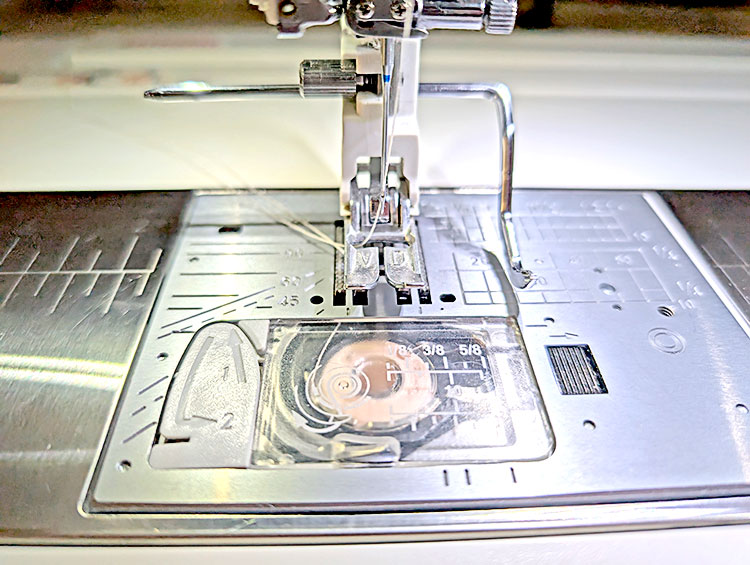
- Re-thread the machine with the contrasting thread in the top and bobbin.. We recommend attaching an Even Feed/Walking foot suitable for decorative stitching for the best control. As mentioned above, we chose to use the Janome AcuFeed™ Flex built-in fabric feeding with the narrow VD foot .
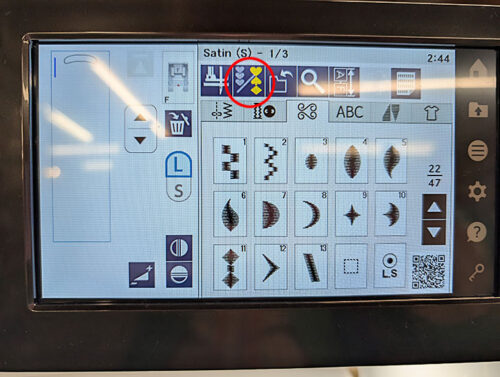
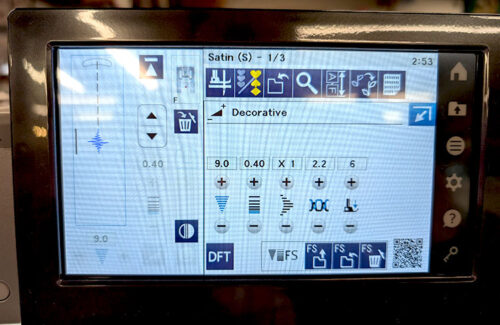
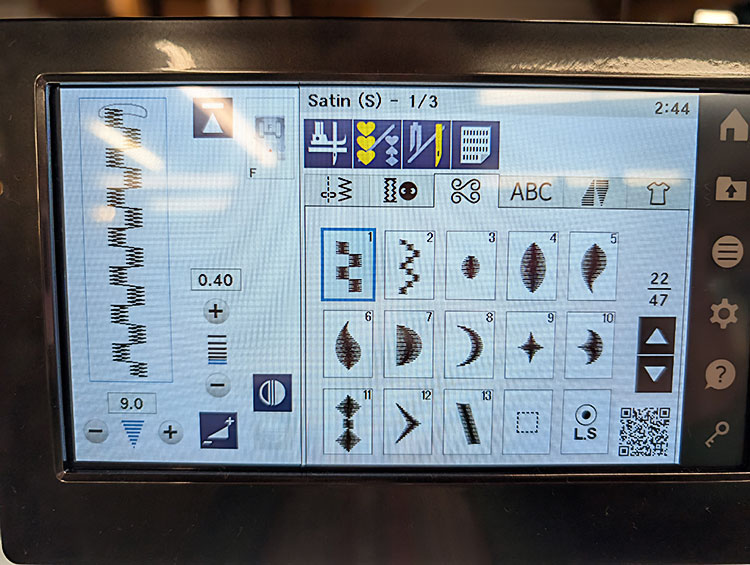
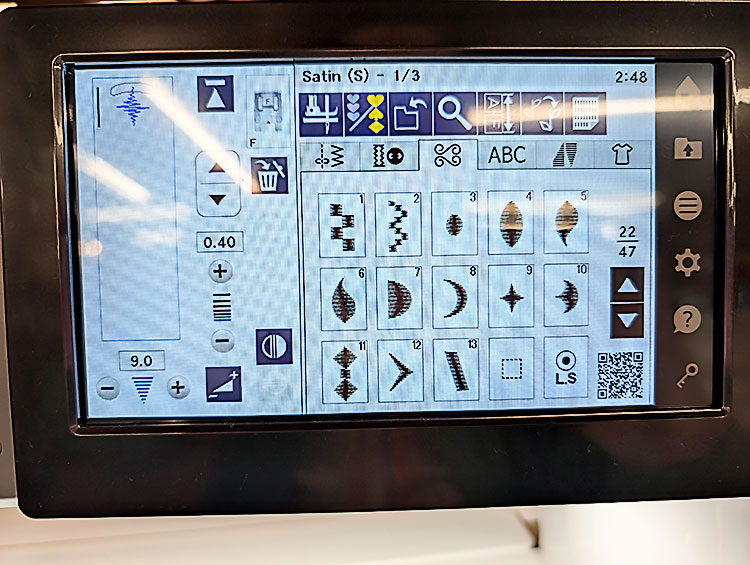
- At your machine, locate the page for decorative stitches. Look for the collection of Satin Stitches. And select a stitch that is symmetrical (even on both sides). This would be shape like a diamond, arrow, or circle.
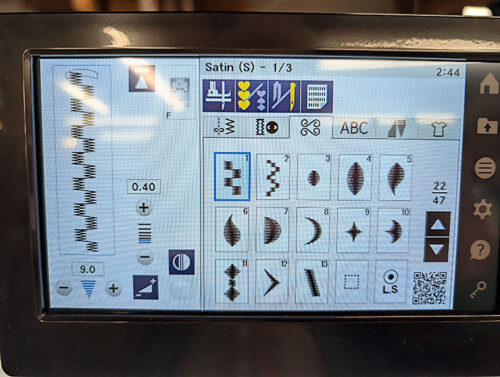
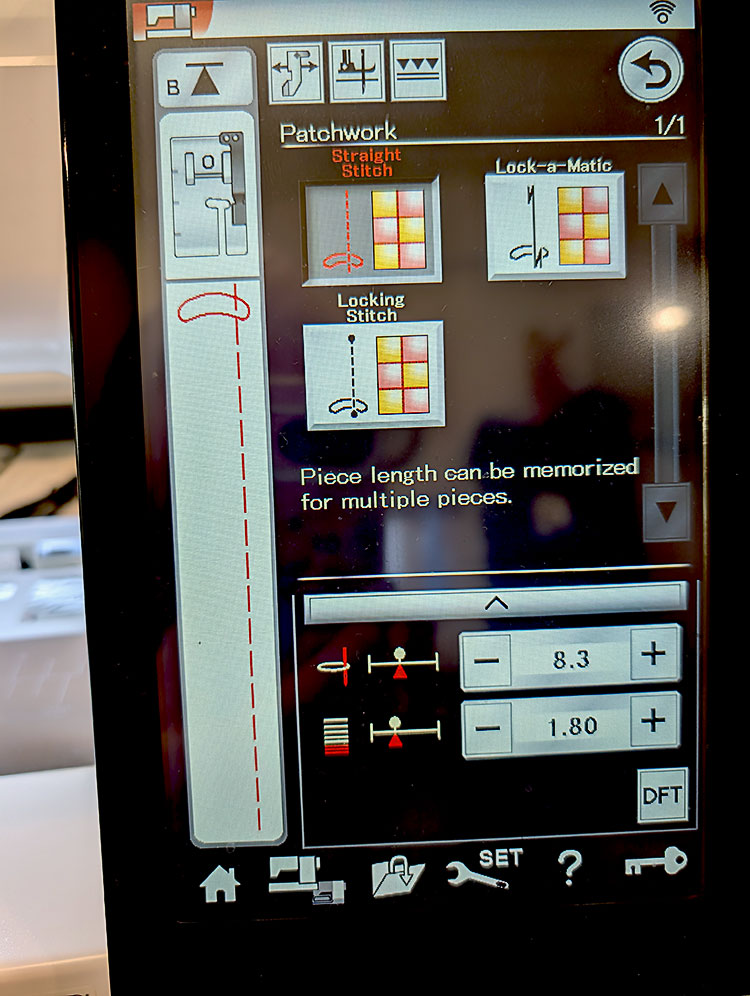
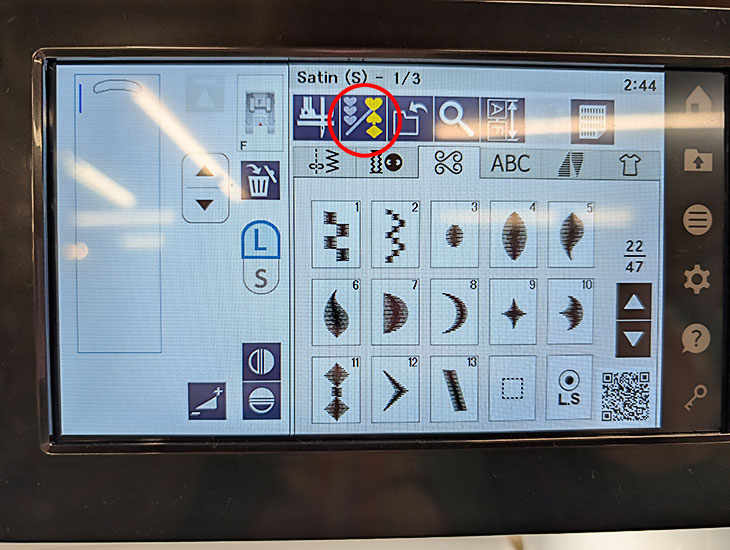
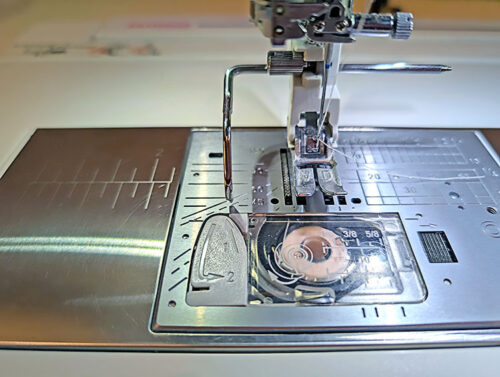
- Select the option to combine stitches. In the photo below, we’ve circled the icon on the Janome machines that changes the stitch from continuous to a combine option.
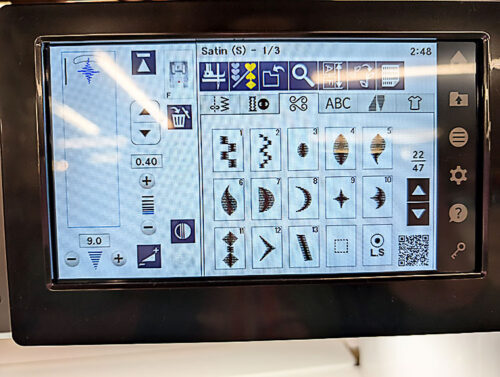
- The selected stitch will now appear as a single stitch.
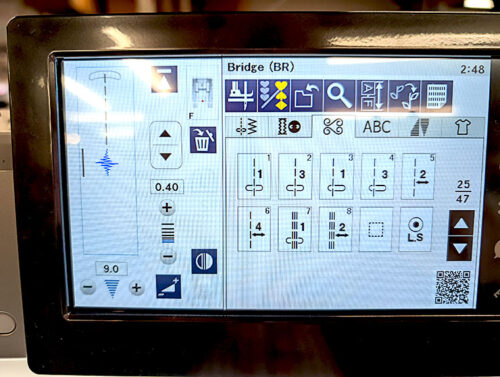
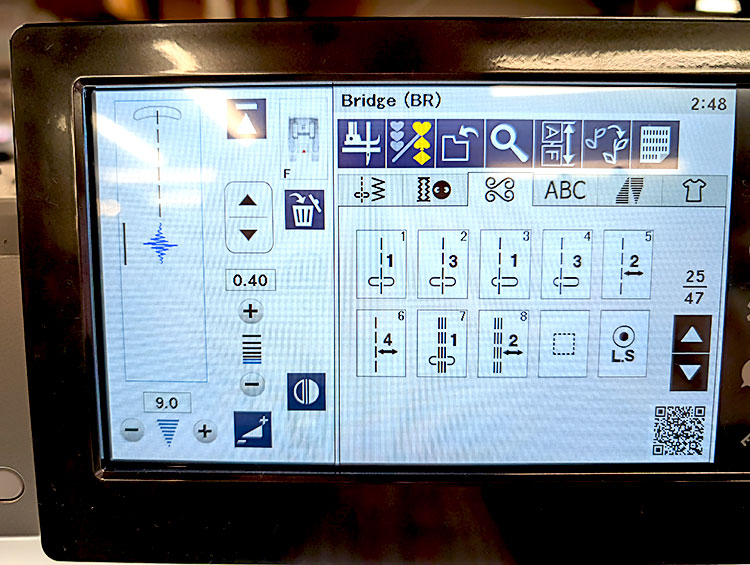
- The next step is to select a straight stitch. Straight stitch options are usually found among the decorative stitch options, and are labeled as Connecting stitches or Bridge stitches. The straight stitches can be positioned to the left, to the right, or in the center. They may appear as a single stitch or multiple stitches.
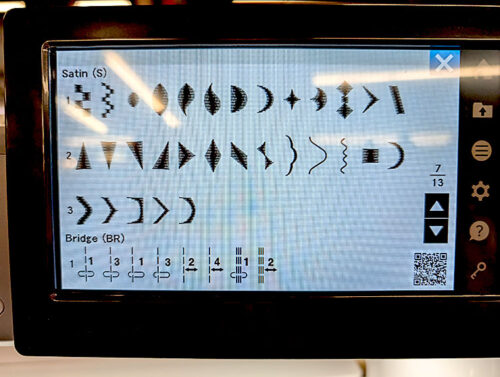
- The goal is to create a length of straight stitches to make a space between the satin stitches.
- BUT FIRST, Now is the time for testing to determine the look you like best. The photo below shows you our “test square” where we played with different shapes, density, and spacing. We simply placed a square of scrap fabric over a matching piece of tear away stabilizer to use as the base panel for our tests. It is very important to test and practice to insure you end up with the right combination!
- For our sample placemat, our final choice was a diamond satin stitch and a group of SIX straight stitches in the center position.


Stitching the decorative seams
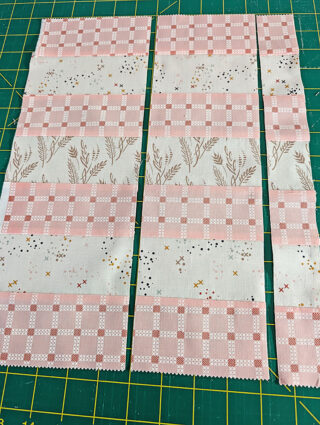
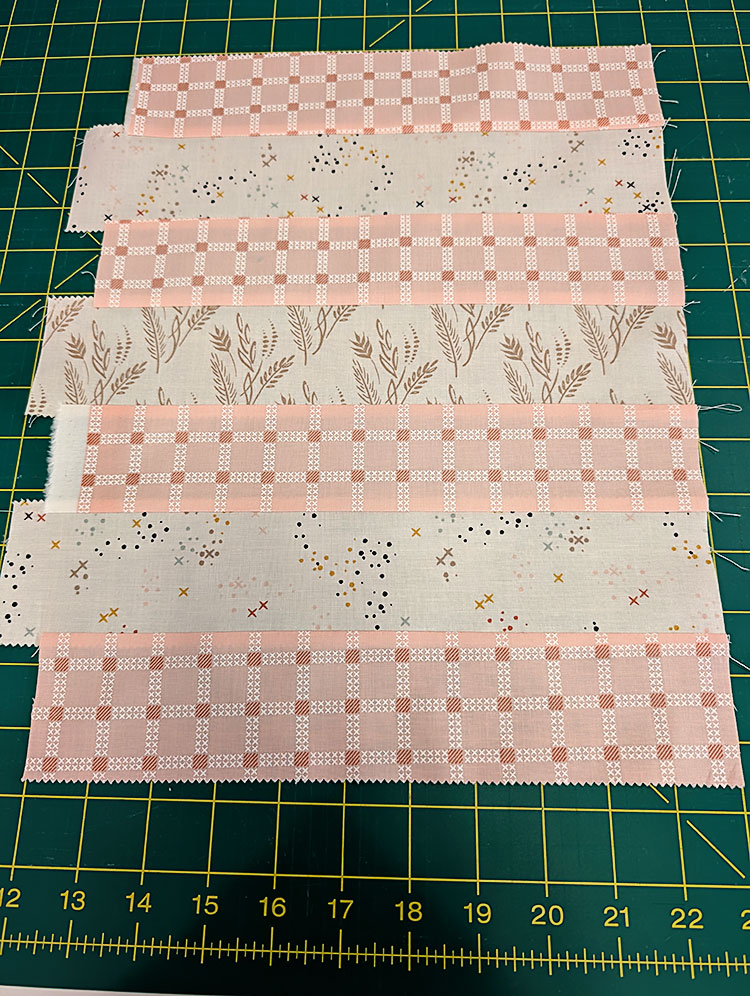
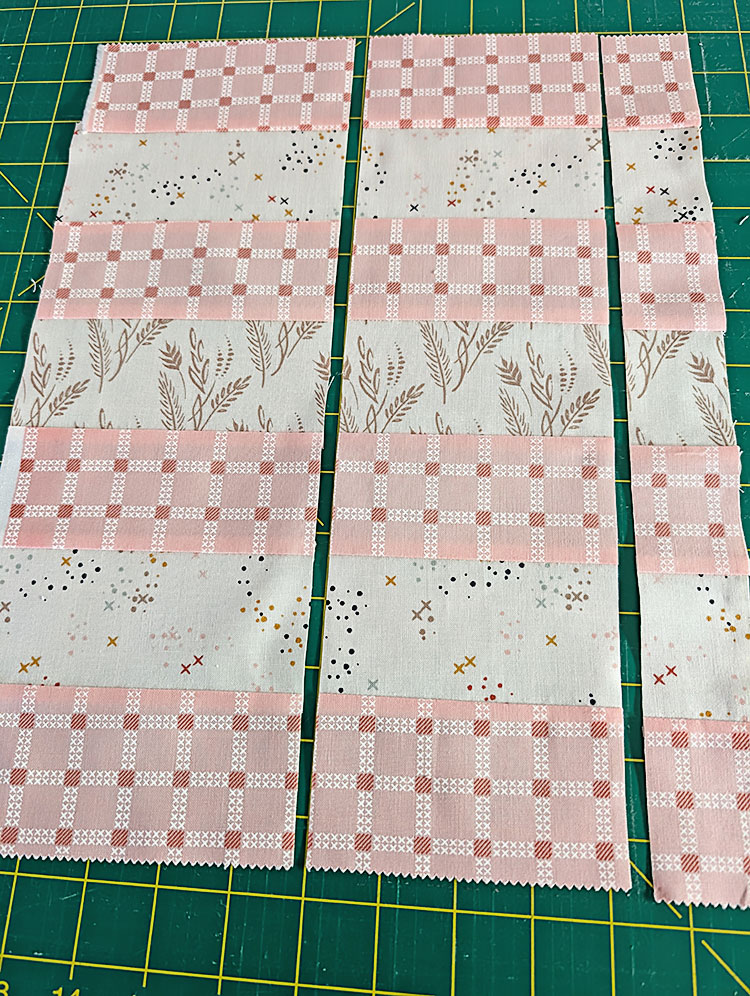
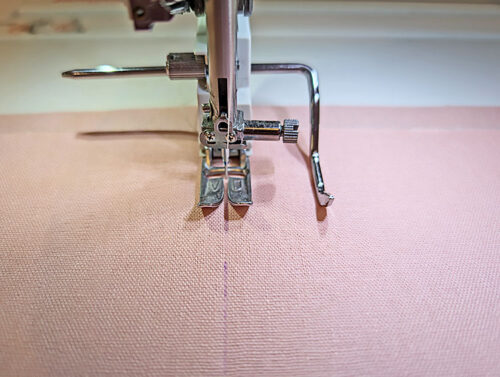
- Find the solid color 8⅝” x 14” rectangle, the solid color 1⅝” x 14” strip, and the three strata pieces you cut above. Arrange them as shown in the photo below..
NOTE: You may notice the height dimensions of the solid fabric and the print strata are different by ½“. We considered trimming ¼“ from the upper and lower edges of the strata, but when sewing the pieces together, this little bit of extra fabric helped us position the checks motif so each seam started at the same point in the pattern, so we left it as-is, trimming everything flush when the panel was complete.

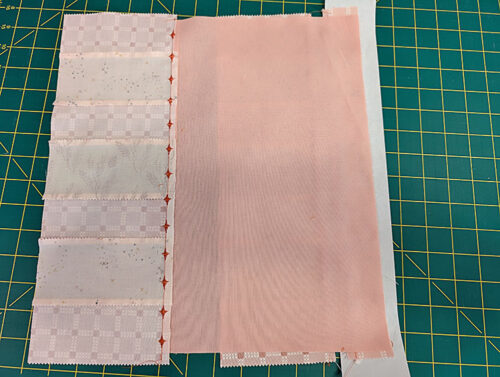
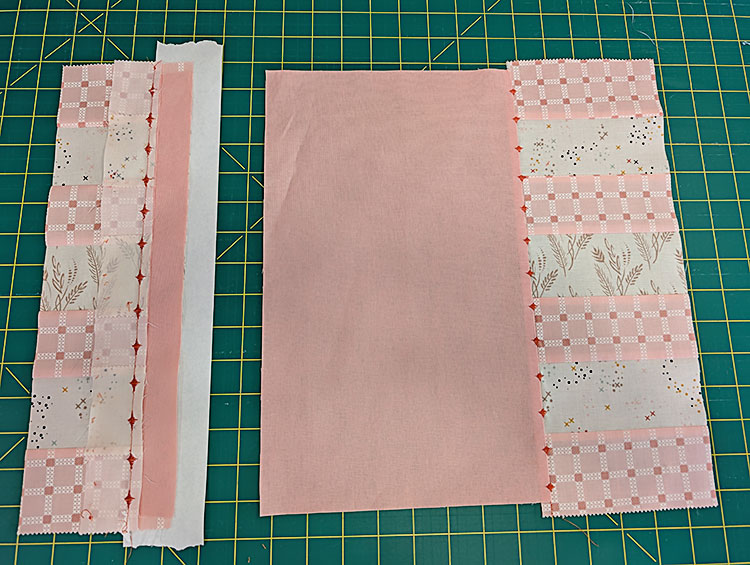
- Place the narrow strata strip and the narrow solid strip right sides together. And, place the center solid panel and the wider rightmost strata right sides together.

NOTE: When layering your pairs right sides together, the solid fabric should be on top. As you follow the steps to create the decorative seam, the seam allowance will always be pressed toward the solid fabric. Therefore, by placing the solid fabric on top, the seam allowance will automatically fold toward the solid fabric. - Find your strips of tear away stabilizer (they should be approximately 2¼” x 15”) or try our trick of using adding machine tape.
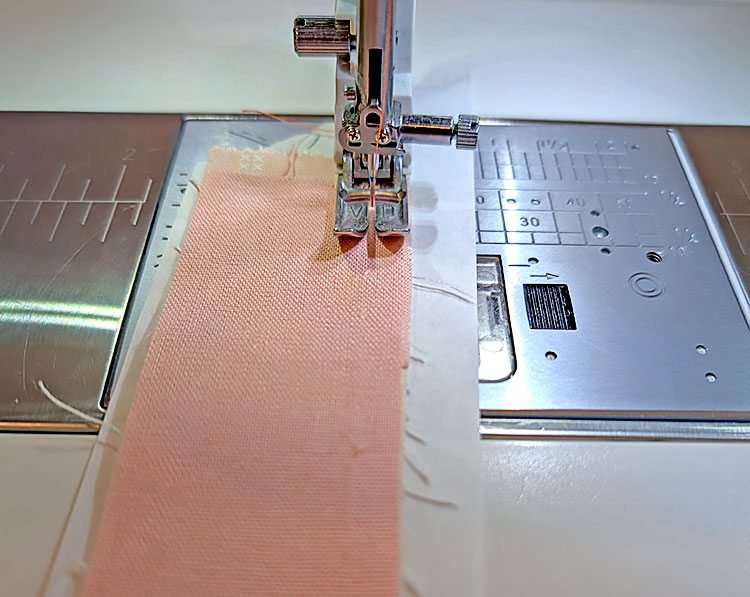
- Place the first fabric pair over a strip of stabilizer. We started with the 1⅝” strips.
- Make sure your machine is still threaded with the contrasting thread in the top and the matching thread in the bobbin, and make sure you have your chosen combined stitch set up and ready to go.
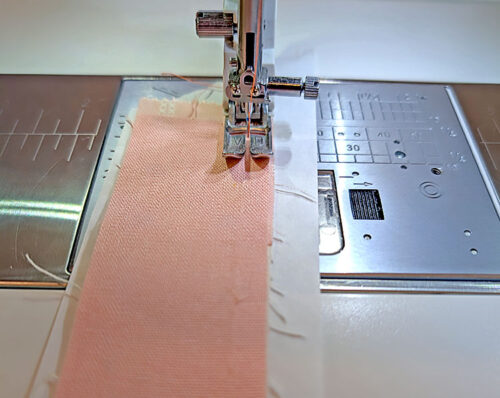
- Sew the pair together with a ¼” seam allowance.
NOTE: As mentioned above, we felt the Janome AcuFeed™ Flex system with the narrow VD foot was the perfect choice for our ¼” seam because the foot is exactly ½“ wide – ¼” on each side of the needle. So it was very easy to keep a super precise seam allowance. - Stitch the length of the strip.
NOTE: For Janome sewers: use the Reverse icon at the end of the seam to lock the stitch and trim. The combined stitches will automatically know to restart at the beginning, ready for your next seam. - Our next seam was the large center panel and the rightmost strata panel.
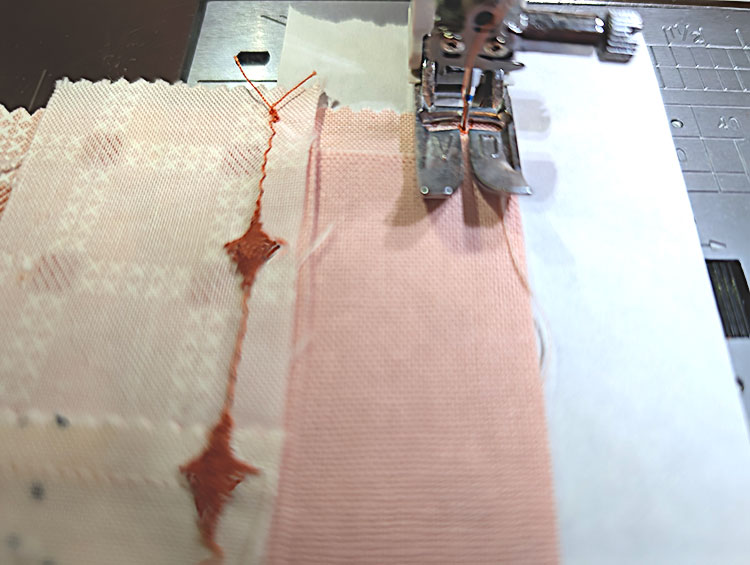
- When each seam is complete, open up the two layers of fabric. At each decorative stitch, gently tug the fabric away from the seam to reveal the entire stitch.

- We’ve included a short video below that demonstrates the simple three-step process to create these pretty “floating” stitches. Click the arrow in the circle to start the video.[html5_video id=124186]
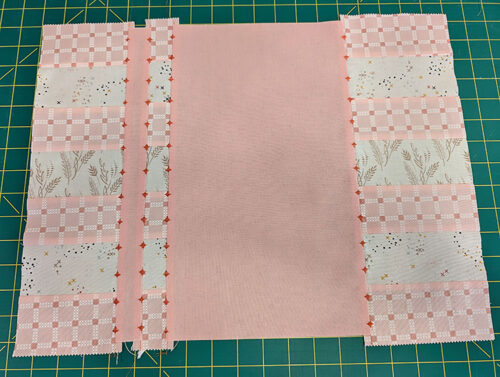
- Our third pair was the sewn-in-place narrow solid strip over the leftmost strata, which you can see prepped in the photo above.
- Set up your stabilizer and stitch top to bottom in the same manner.

- Then gently pull apart to reveal another pretty decorative seam.
- The fourth and final decorative seam attaches the center panel to the final raw edge of the narrow strata. Once again, make sure the solid fabric is on top.
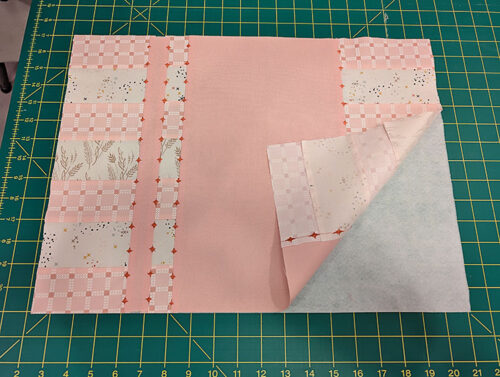
- Pull apart and here is your finished patchwork with four decorative seams. Remember, all the seam allowances should naturally fold towards the solid color. Press well across the entire panel.
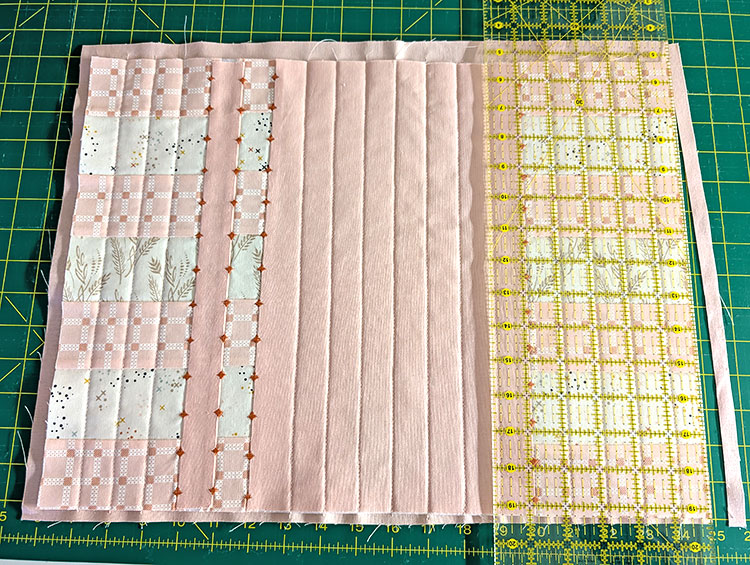
- Trim the excess fabric so the placemat measures 19” x 14”. All four raw edges should be straight and true. Again, a ruler and rotary cutter is best for this trimming.

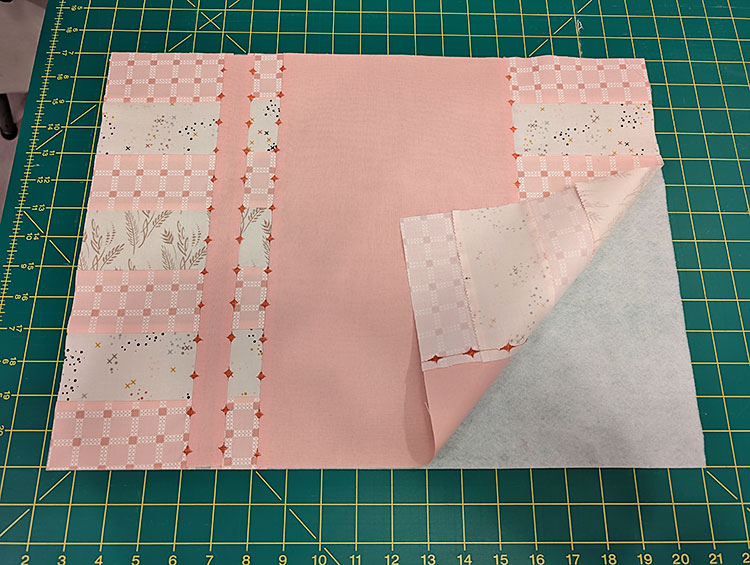
- Find the 19” x 14” panel of fusible fleece. Place it fusible side up and flat on your work surface. Place the placemat top right side up on the fusible fleece.The layers of all four sides should be flush. Following manufacture’s instructions, fuse the fleece to the placemat panel.


Straight line quilting
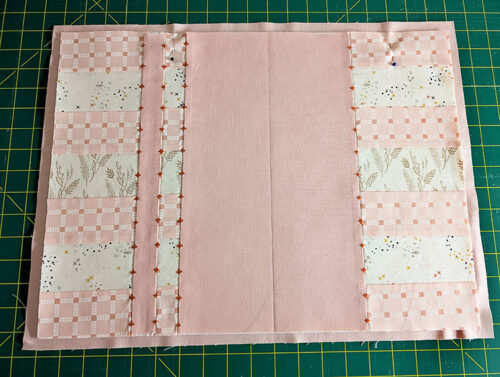
- Find the 20” x 15” back panel and place it right side down and flat on your work surface. Place the fused front panel right side up on top of the back panel, centering the front panel top to bottom and side to side. Lightly pin the layers together around the perimeter of the placemat.
NOTE: As the quilters out there know, a quilt backing is always cut larger than the finished project. This allows a bit of extra fabric for the quilting. The denseness of quilting stitches tends to cause layers to shrink up a bit. - Using your fabric pen or pencil, make a vertical line at the exact center of the main 8” wide solid panel. As always when you’re working on the right side of your fabric, make sure your marking tool is one that will easily wipe away or vanish with exposure to the air or the heat of an iron.
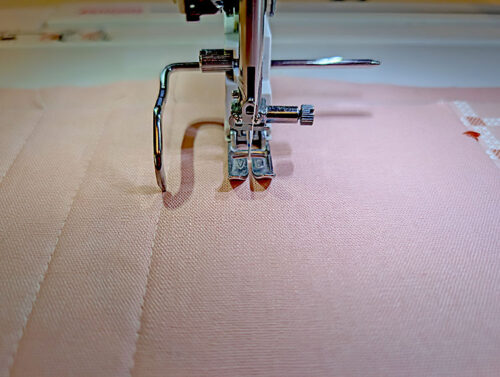
- Re-thread the machine with all purpose thread to match the solid fabric in the top and bobbin. Re-set for a standard straight stitch, adjusting the length to 2.8 mm. If possible, continue to use an Even Feed/Walking foot or continue to engage your built-in fabric feeding system. We left our AcuFeed™ Flex system engaged and the narrow VD foot in place, but we added a Quilting Guide Bar to allow us to set up for perfectly spaced 1” quilting lines. Insert the bar so the guide is to the right of the foot, adjusting it so it sits 1” from the needle.

- To start your straight line quilting, stitch first along the center marked line.
- Remove the mat from the machine and set up for the second row. Place the Quilting Guide Bar on top of your first line of stitching. Because the Bar is set for 1” intervals, your second row of stitching will be perfectly spaced.

- Continue moving to the left, adding lines of stitching until you reach the decorative seam. Skip over all three lines of decorative stitching, then place Quilting Guide Bar on top of the third line of decorative stitching, setting up for the next line of stitching to hit at an exact 1” into the strata.

- Continue quilting until the final line of quilting is 1” from the left raw edge.
- To complete the remaining right side of the placemat, remove the quilt bar and reposition it so the guide is now to the left of the foot.
- Position the Quilting Guide Bar over the first line of stitching – that center line of the main panel. Using this center line as your guide, add your quilting lines in the same manner from the center to the right. Remember to skip the decorative seam as you did on the opposite side.
- When the quilting is complete, trim away the excess fabric so the layers along all four edges are perfectly flush. Once again, a ruler and rotary cutter are best for this step.


Narrow binding
- The center of this placemat is so pretty, we wanted to keep our bound edge as narrow as possible. However, we knew some weight along the edge was important. For table linens that must lay flat, like placemats and runners, you need a bit of weight at the edge. If your perimeter is too lightweight, the corners will want to curl or flip. Don’t want that! A traditional double-fold, wrapped binding was just what was needed to finish the placemat.
- Find the two remaining Jelly Roll strips you selected for the binding. This type of strip is always 2½”, but our desired finish for the width of the binding was just under ⅜”. With a traditional double-fold wrap, 2½” is too wide. We trimmed off ½” for a starting width of 2”.
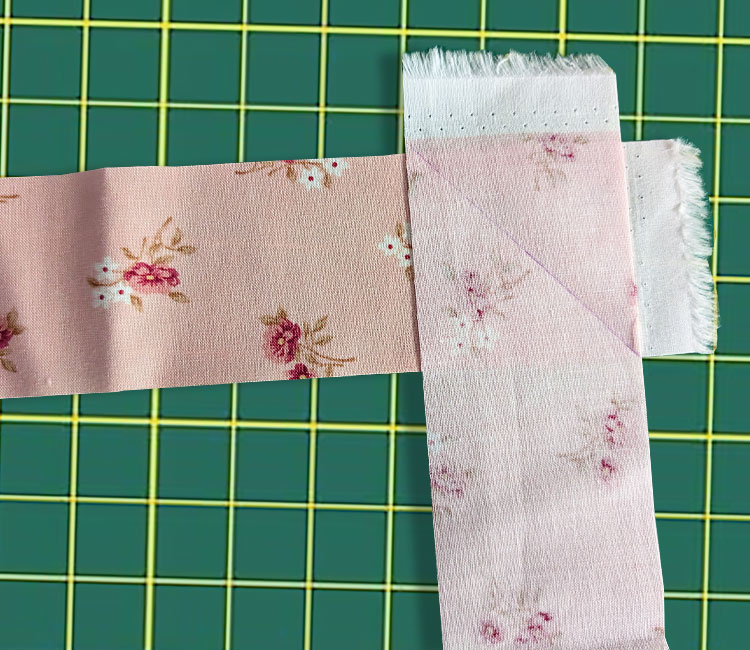
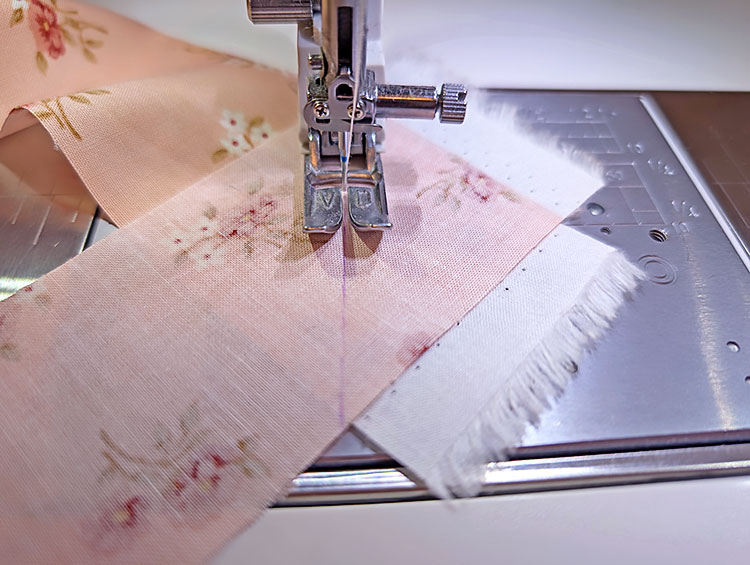
- Join the 2” strips end to end with a bias seam. This means you overlay the ends at a right angle and draw in a diagonal line across the corner.
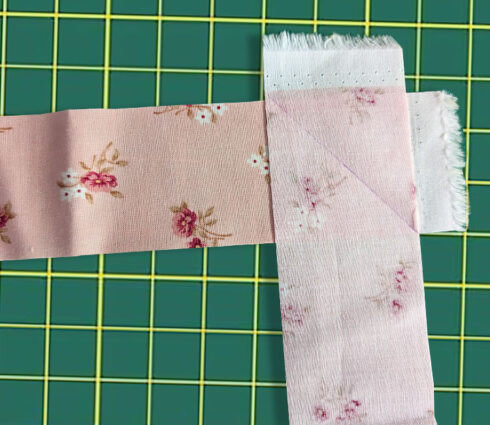
- Trim back the seam allowance to ¼” and press open the tiny seam.

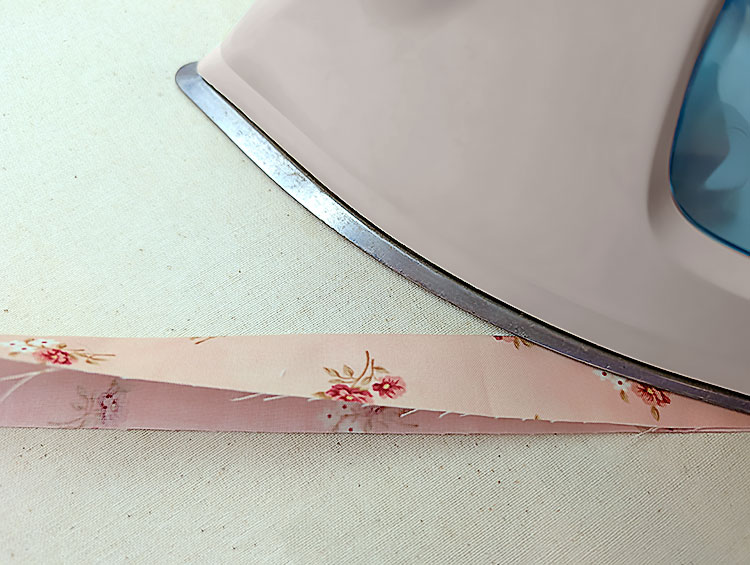
- Fold the long strip in half, wrong sides together. Press well, making sure the raw edges are flush along the entire strip.

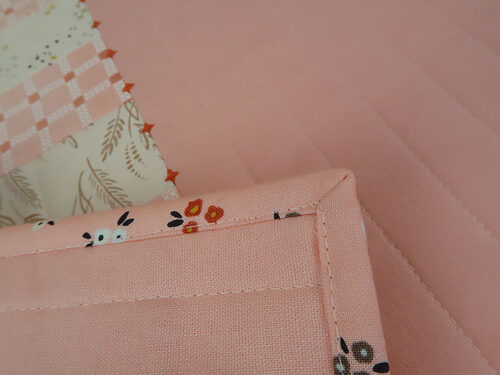
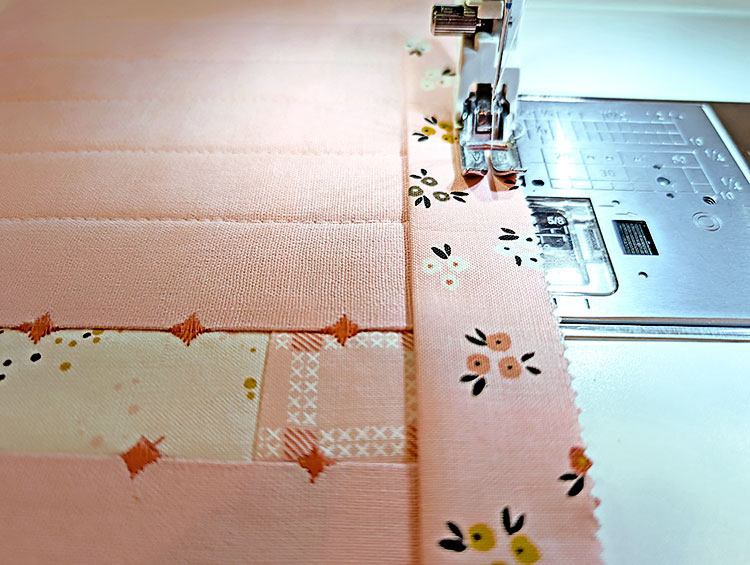
- Working on the right side of the placemat, align the raw edges of the binding strip with the raw edge of the placemat. We like to start at the center bottom. Using a ¼” seam, stitch the binding to the placemat, stopping and mitering each corner. Join the ends with your favorite method.

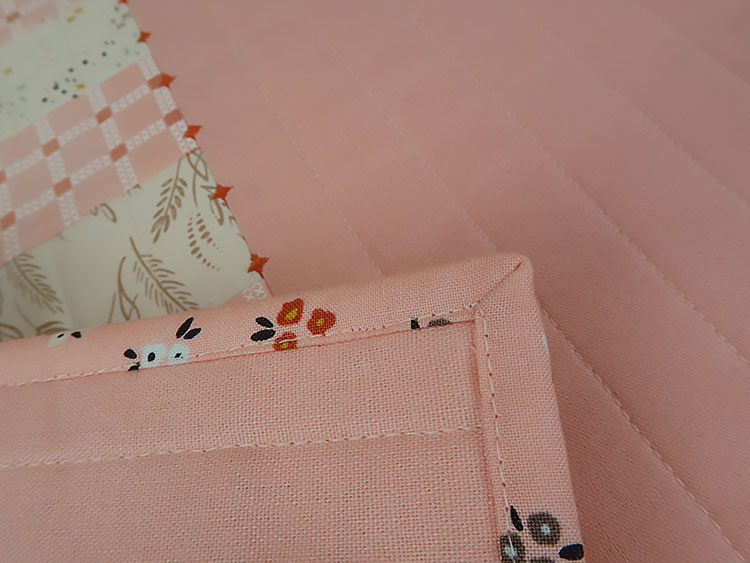
- Wrap the binding around to the back, pulling it taut, and pin or clip in place all around. You have ¾” of binding to work with; you want to end up with a 5/16” reveal on the front and 7/16” at the back. This means the fold at the back should just cover the original ¼” line of stitching.
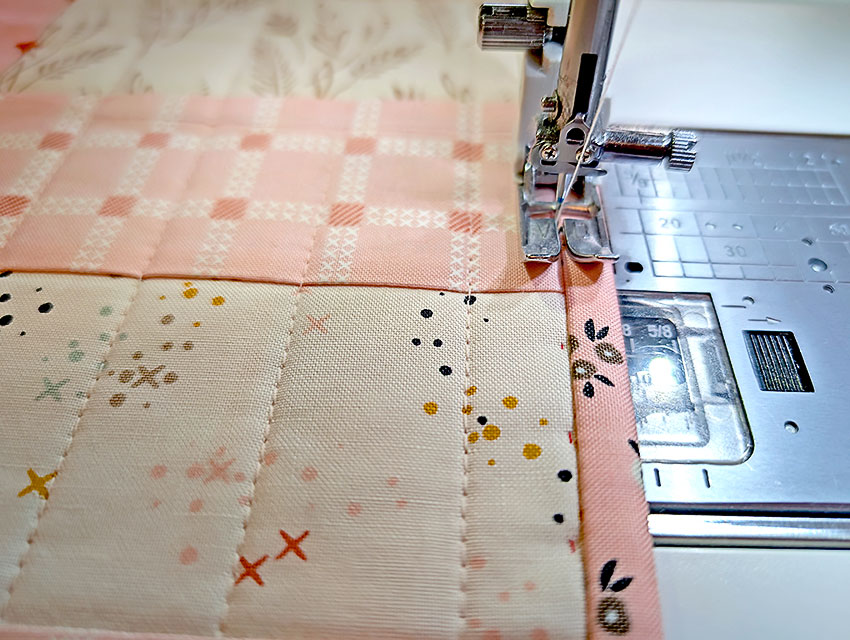
- Flip the mat so it is right side up and stitch-in-the-ditch, which means to stitch right on top of the original seam.
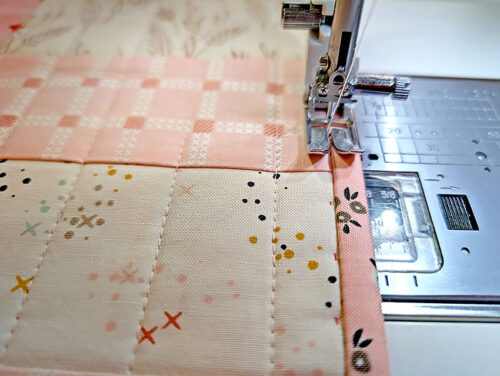
- Remember to pivot at each corner, and to go slowly and carefully to insure you are catching the edge of the binding at the back as you sew.
NOTE: This is a very traditional quilt binding process and we have summarized it here. If you are brand new, check out our full tutorial on bias binding basics.
Project Design: Anne Adams
Sample Creation and Stitch Technique Development: Michele Mishler
Gret and pretty placemat, but that special stitching is great and I want to try it on a quilt block I am making. Thanks for the ideas.
Hi Gail – Thank you so much. It would be a great technique to use along a quilt block. Let us know how it turns out for you!
I have a BIG problem with this project: it’s too pretty to use!
Oh, and am I being too much of a fangirl if I said that I had an inkling it was Michele’s work before I scrolled all the way down??
HA! Thanks for having the be your only problem 🙂 But remember, life is short – use the good dishes … and the good linens. Enjoy!